Using News & Publications Entries
Use the Guide to Create News & Publication Entries
Follow the guide below to learn how to create News & Publication Entries.
Sign into the admin panel to add your News & Publications entries here.
News & Publications List
How to Add a News & Publication Entry
1. Navigate to the News & Publications section of the admin panel

2. Click the Add News & Publication button to create an empty entry

3. Click into the Title field to add the News & Publication entry’s title

4. To add description / body content to the entry, click into the Text Editor field

5. To add a Downloads box to the entry, click into the Post Details > Downloads tray to open the field options.

6. Click into the Text field to add a Title to the Downloads box.

7. Click the Add Item button to add the Downloads, then click the Add File button to open the File fields

8. To add a File Download, keep the radio dial selected for the File Type
Then, click the Add File button to select the download from the Media Library

9. In the File/Link Settings, click the Choose Media button to open the Media Library

10. Use the Folders or the Search Media field to find the download you’d like to include

11. Select the File you want to add, then click Select to save to the download entry

12. Click into the CTA Title field to include the title of the attached File.
Then, adjust the Icon dropdown as needed, to select the corresponding file type icon

13. To add a Link Type file, you’ll select the Link radio dial and click the Select Link button to open the File/Link settings

14. Click into the URL field to add the link for the download entry.
Then, click into the Link Text field to add the label for the download link.
Once changes have been added, click the Add Link button to save your updates

15. If the Icon field is not selected to No Icon, use the dropdown arrow to open and adjust to match the file type you’ve added.

Tip: Repeat Steps 7-15 to add as many downloads as needed.
16. Optional step: To customize the 3 related entries that display, you can click into the Related Posts section to open the field. If you don’t need to customize these related entries, you can skip this step and leave the field empty.

17. Click into the selection box to add 3 other News & Publications entries to this entry.

18. Assign the Category by selecting the correct checkbox

19. Add an optional Featured Image to this News & Publication post by clicking the Set Featured Image button

20. When the Media Library is open, you can use the Folders or Search Media field to find the image you’d like to feature for this News & Publication entry

21. Select the image, then click Set Featured Image to save it to the entry

22. If you would like to feature this post on the Homepage and News & Publications pages, you can toggle this option to Yes.
Note: Entries that are selected as Featured will display on the Homepage and News & Publications automatically, showing the 3 most recent entries

23. To add Contact Information to the on-page navigation, click the dropdown field to open the options and choose a Contact from the list. If your desired contact is not listed, add them through the Contact Directory first.
To add Links to the on-page navigation, click the Add Link button to open the File/Link settings

24. Once all updates have been completed, click the Publish button to publish this entry on the public-facing site

A published News & Publication entry can be added to other page modules throughout the new OFM site.
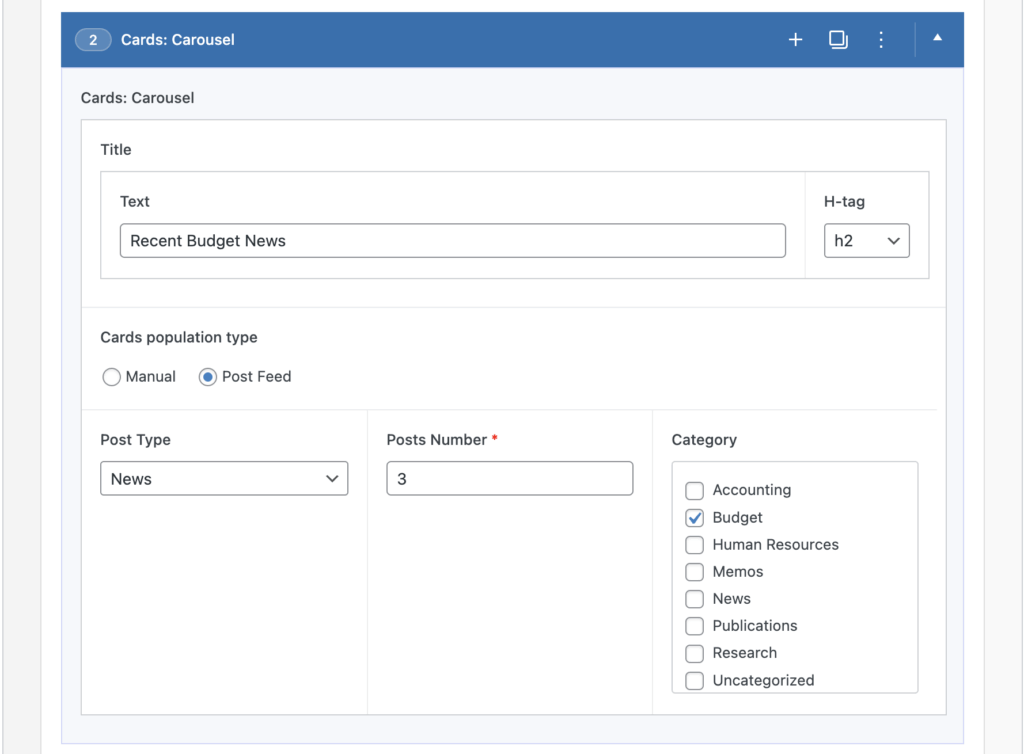
For example, you can show the News & Publications entries based on their Category in the Cards: Carousel module, as we’ve done on the Budget Resources page.
Here’s what the module looks like on the back end:

Check out the Recent Budget News Cards: Carousel module example below.
The cards will continue to update automatically when a News & Publication entry with the Budget category is published.
This reduces the amount of updating web editors have to do on an individual page, and keeps the publishing process in the News & Publications database.

