


Contact Directory Guide
In This Section
How the Agency Assignment and Contact by Topic tabs work
How the Agency Assignments and Contact by Topic tabs work
1. Both the Agency Assignments tab and the Contacts by Topic tab are programmatically populated based on selections on individual contact cards. We’ll walk through both on this page because they’re so similar — understanding one will help you understand the other.
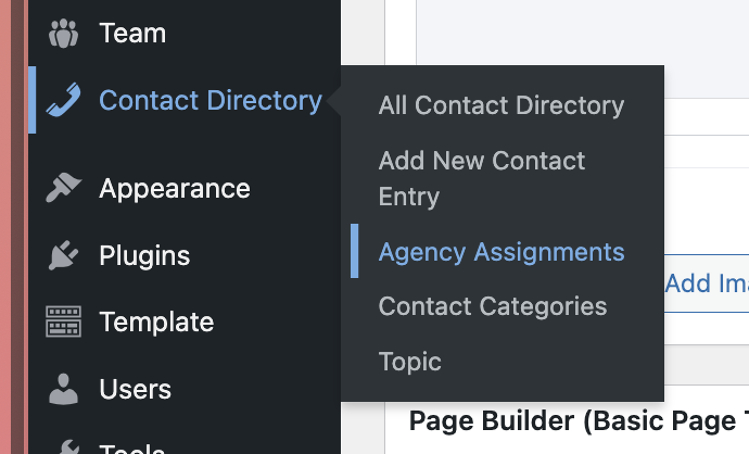
2. On the Agency Assignments tab, the Jump to Letter and the list of Agencies can be updated or edited via “Contact Directory > Agency Assignments” on the backend of WordPress. (Note: only website Administrators have access to edit Agency Assignments).
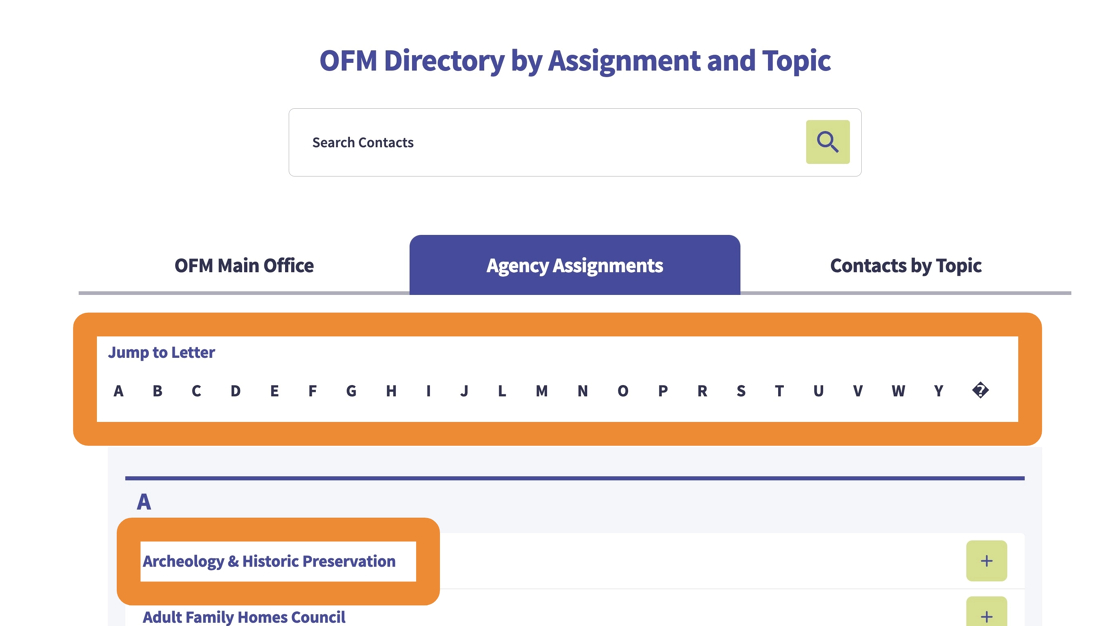
3. Here’s where you’ll find that section.
4. The assigned contacts in the trays for each agency are selected on each individual contact.
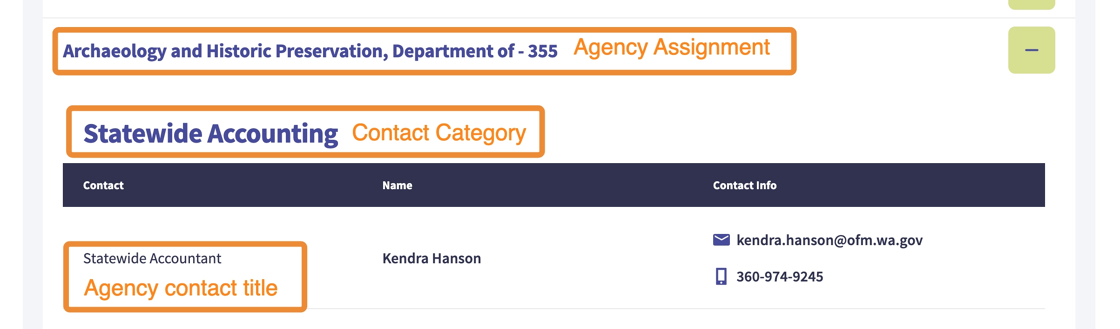
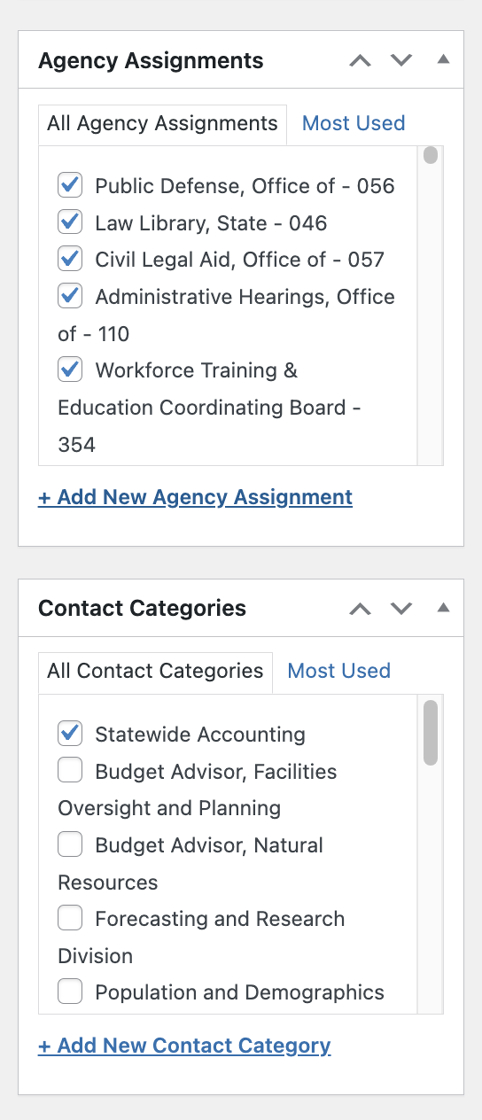
5. To appear on the Agency Assignments tab, a contact needs 2 things selected:
- Agency Assignment — each agency they are assigned to needs a check next to it.
- Contact Category — selecting the category adds the tray beneath the agency.
If a contact is not showing up in an agency, check to ensure they have both of these things selected properly.
6. Similarly, the Contacts by Topic is also programmatically assigned.
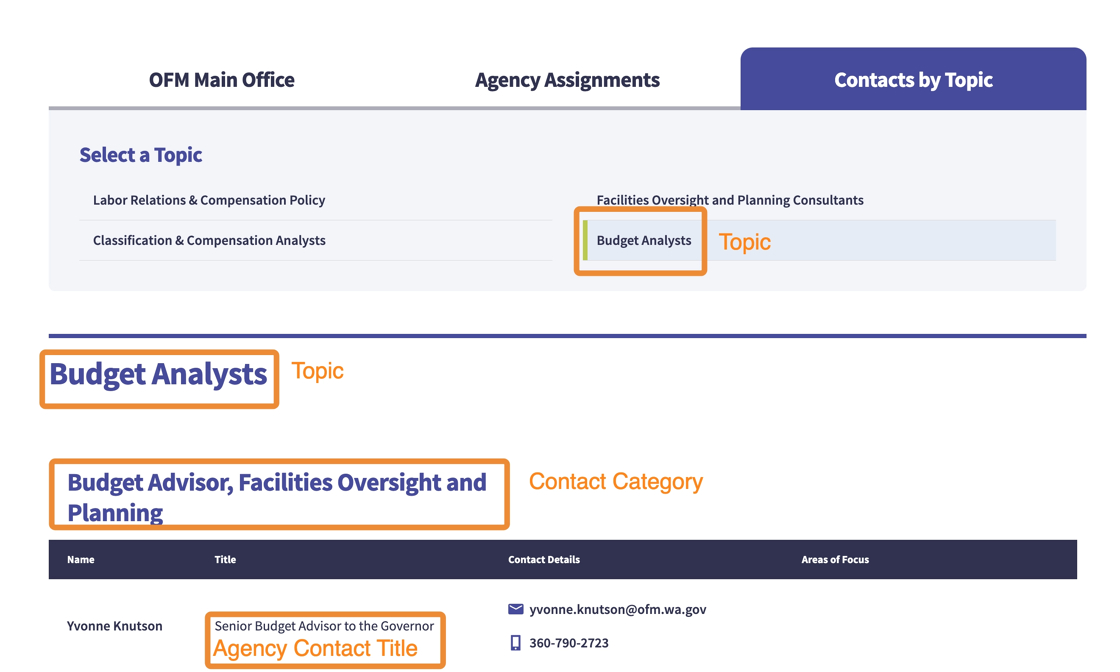
7. To appear on the Contacts by Topic tab, a contact needs 2 things selected:
- Topic — select the title of the Topic tab that they should appear on.
- Contact Category — selecting the category adds the tray beneath the Topic.
If a contact is not showing up on a Topic, check to ensure they have both of these things selected properly.
The only reason to add a Topic to a contact is to show that contact on the Topic Tab.
Add or Update a Contact
Add or Update a Contact Entry in the Directory
1. Click “Contact Directory”

2. Then, Click the “Search Contact Directory:” field to search for the name of the contact you are seeking to add or edit — either way you will want to check to see if an entry already exists. Duplicate entries will make the directory inaccurate and hard to use over time.

3. Click “Submit” to search

4. If the contact already has an entry, select “Edit” to update it.
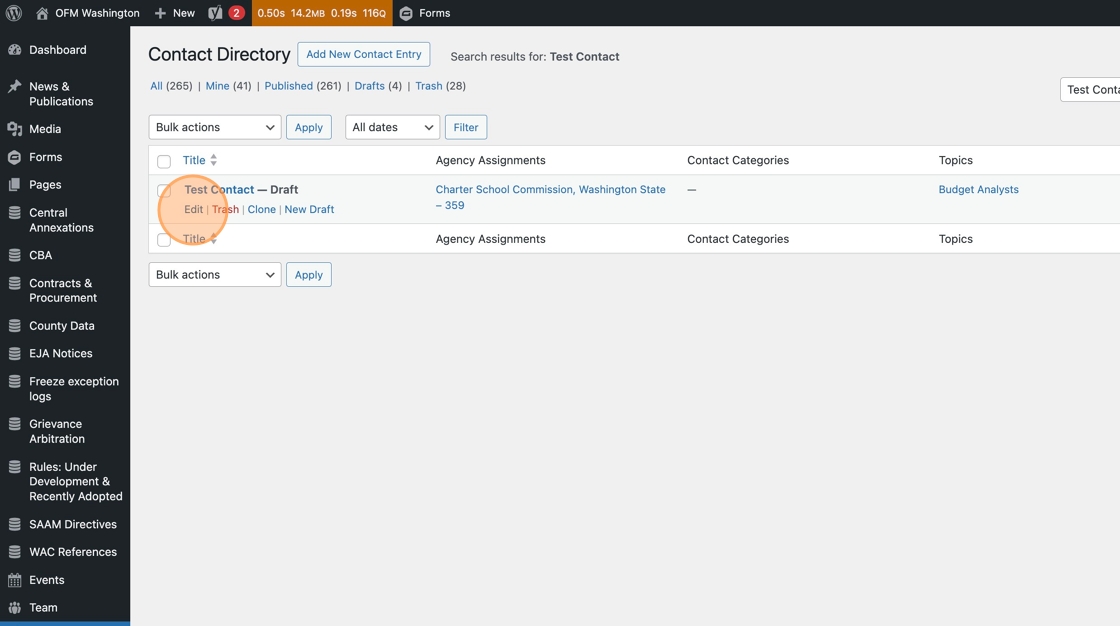
5. If you’ve confirmed the contact does not already have an entry, then you can use the “Add New Contact Entry” button to start a new one.

6. Add the Name in the title field.
To add a phone number click ‘Add number’ — this is optional.

7. In the Phone Number field type the number using only hyphens, e.g. 323-555-1234
Use the optional Phone Type field to specify if the line is Office, Cell or Teams.
Use Add number to add more.

8. To add an email address, type it into the “Email” field

9. If you’d like to add Location, enter it here in the WYSIWYG editor.

10. You can add any sub-specialities in the WYSIWYG Area of Focus editor. Put each one on a new line.

11. Next, add the appropriate titles. There are 2 fields here, we recommend you fill out both.
- Service Role Title will appear in search results. We recommend someone’s official title here.
- Agency Contact Title will appear when a contact is added to any of the three tabs (Main Office, Agency Assignments, or Contacts by Topic). Note: This may be the same as their Service Role Title or it might be more customer facing. E.g. an Agency Contact Title might be Policy Consultant while the Service Role Title is Sr. Policy Consultant Level 3.

12. If the Contact should appear on the Agency Assignments tab, select their assigned Agencies.
Pro Tip: You can use your browser’s search function (CTRL + F or Apple + F) and it will search inside the Agency Assignments box, which can help locate the agency more quickly.
Note: if you cannot find the Agency you are looking for, reach out to alma.perez@ofm.wa.gov or submit a Help Ticket. Only website Administrators can add new Agencies to this list.

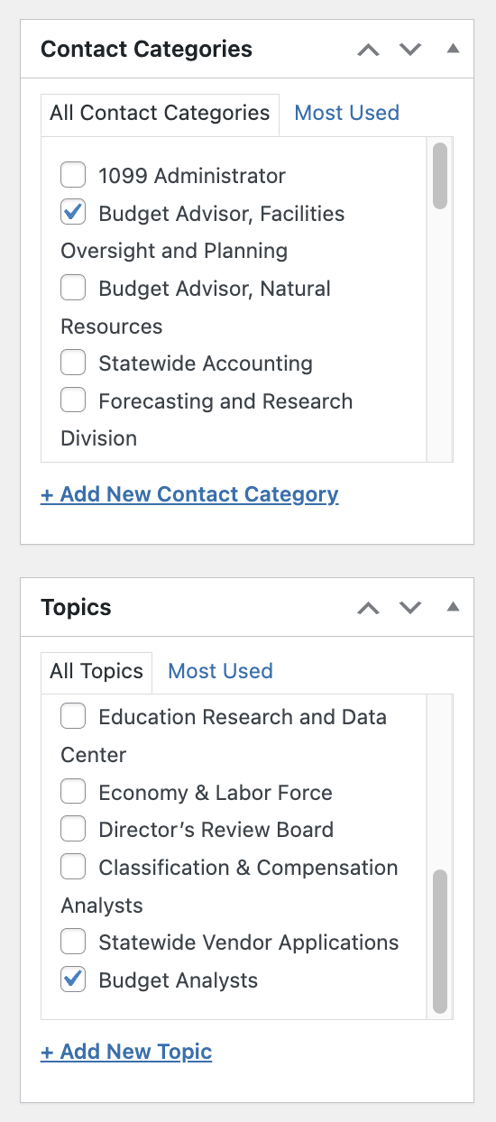
13. Add the relevant Contact Category — these are the trays that appear under each Agency on the Agency Assignment tab (e.g., Budget Advisor, Statewide Accounting) or in the trays on the Main Office Tab (e.g., ADA Coordinator, Division). They are also the trays that appear under each Topic on the Contacts by Topic tab.
We have pre-populated the Categories based on Discovery and User Testing — if you think any need to be added, reach out to alma.perez@ofm.wa.gov or submit a Help Ticket. Only website Administrators can add new Categories.
Pro tip: if a contact is not appearing where you expect them to, check to make sure that a Category is assigned and that it is the correct one.

14. If the contact should appear on the Contacts by Topic tab, select the appropriate tab Topic here.
We have pre-populated the Topics based on Discovery and User Testing. If you think any need to be added, reach out to alma.perez@ofm.wa.gov or submit a Help Ticket. Only website Administrators can add new Topics.

15. When you’re ready to save, click Publish / Submit.

16. We recommend checking the Directory from the front end to confirm that the contact is appearing where you intend them to appear in the Agency Assignments and Contact by Topic tabs.
Add a Contact Card to a Page
Add Contact Card information to a Page
One of the best things about the One OFM databases is that not only can you add information to the database, you can also take data from the database and put it on a page. The new contact card in WordPress pulls from the Contact Directory database, so if you ever need to update a contact, you’ll do it in one spot and it will update on every page it appears on. Nice!
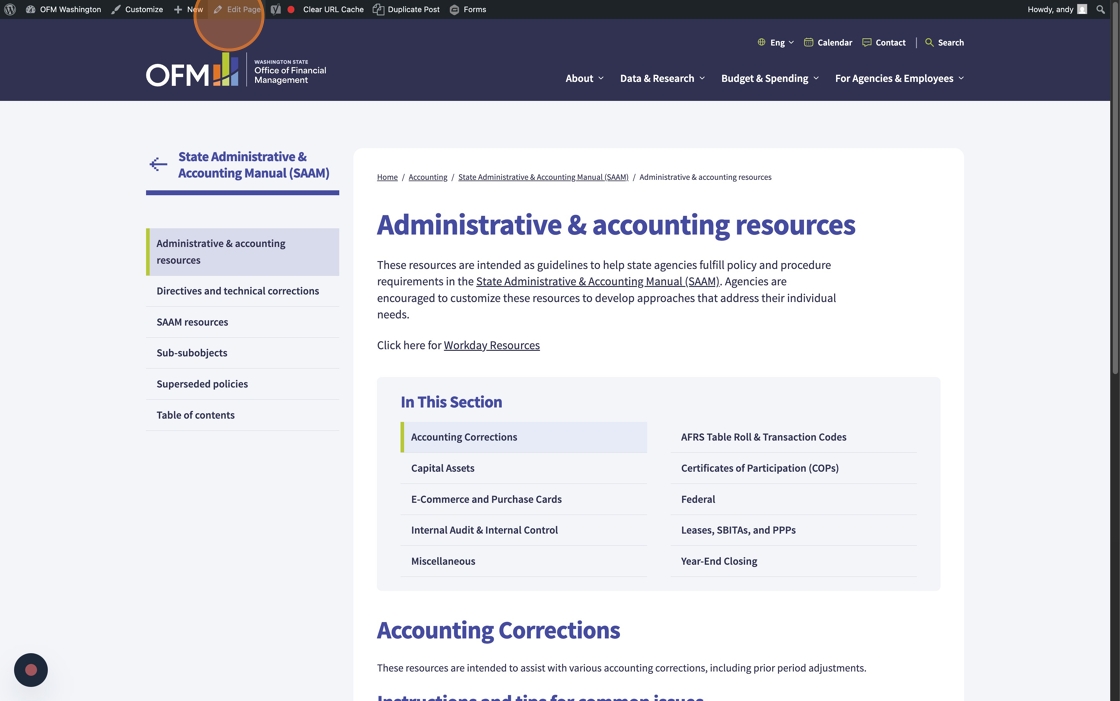
1. Click “Edit Page”
2. On the right side of the page editor, there is section called Page Sidebar. This is where we’ll be adding the Contact Card.

3. Using the drop down, select the Contact, or search for it.

In this example, we added the Accounting division contact. We’ve pre-populated the Contact Directory, so you should find what you’re looking for in there. If you need to add a new Contact, you’ll do that by adding a Contact into the Directory first, then coming back here to select it on the page.

4. If you’d like to point your users to find Agency Assignments or their dedicated analyst, use the Sidebar Links option.
Click “Select Link”

In this example, we added a link to the Agency Assignments tab of the Contact Directory, and added the link text “Find your statewide accountant”

5. Click “Preview Changes” to check your work.

6. Click “Update” to save.
How the Main Office Tab works
How the Main Office Tab works
Note: only website Administrators have access to this page.
1. The Main Office tab can be edited as a page. You can access it from the backend by searching by title or go to the front end and click “Edit Page” in the toolbar.

2. The page editor is a lot like other page templates. It has a Title (“Contact Us”) and Hero just like a Hub page does. This is also where you can edit the image.

3. Beneath the hero is a Page Builder section — click to open it up and reveal the content in the Contact Directory section.

4. The Title here changes the title beneath the hero, that’s on a white background. This is the descriptive title for what all of the tabs do in the directory.
In the “Categories for Main Tab” section, you can add or delete trays from the Main tab.

5. Click in and you’ll see a drop-down of the Categories. You can also drag and drop to re-order them. They will appear on the page in the order they are here in the field.

6. Content blocks follow — these have a title and a WYSIWYG text editor.

7. You can add more rows if you need them.

8. The “Important Notice” field populates on the right-hand side of the main content column. At launch, this had an Employment Verification note. You can edit the title and text here.

9. You can also add rows as needed. Verify that the formatting looks how you would expect using test copy and a quick “Preview” before you spend a long time adding or editing content.

Tip: Remember to save and publish your work by clicking Update!
Add or Edit Agencies, Contact Categories, and Topics
Note to Web Administrators
The Contact Directory is pre-populated with Agencies, Categories, and Topics based on our Discovery and User Testing. Please double-check before adding or deleting anything in one of these sections, as this may cause duplicated data, redundant or confusing categories, and introduce errors.
How to Add, Edit, and Delete Agency Assignments, Categories, and Topics
Add, Edit, or Delete Agency Assignments
1. Click “Agency Assignments”

2. In the Name field, add the agency name followed by a dash and their number, if they have one.
You can skip over Slug and Parent Topic — they’re not needed.
3. Click “Submit”

4. To Delete an Agency, click “Delete.” The count column on the far right can be useful information to check before you delete — it will tell you how many entries have this Agency selected. If you delete the Agency, it will remove the selection from those contacts.
Proceed with caution: This is not reversible.

Tip: If you need to Edit the entry at any time, you can do that from here by clicking Edit.
Add, Edit, or Delete a Contact Category
5. Click “Contact Categories”

6. Click the “Name” field and add the Category name — be sure to follow any naming conventions that related categories are using, e.g. “Budget Advisor, Specialty.”
Note that these Categories populate both the Agency Assignment trays and the Contacts by Topic trays, so the name you use should make sense to users in those two contexts.
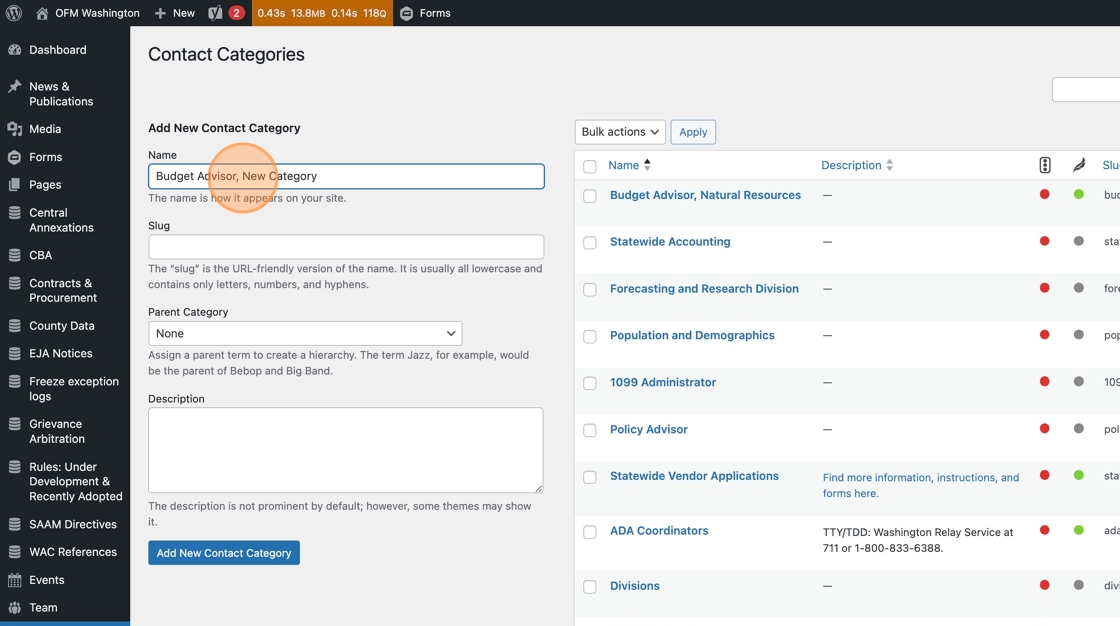
Tip: You can skip over Slug and Parent Topic — they’re not needed.
7. Click “Submit” and it’ll be added!

8. To delete, click “Delete.” You can reference the count column before you delete to see how many contacts are currently using this category and view them. This can be useful context before you delete. Proceed with Caution as you cannot undo this step.

Tip: If you need to Edit the entry at any time, you can do that from here by clicking Edit.
Add, Edit, or Delete Topic
9. To Add, Delete or Edit a Topic in the contact directory, click “Topic.” Topics are what create the sections on the Contact by Topic tab of the directory.

10. Click the “Name” field to add the Topic name — this is what populates the Tab and the Header.

Tip: You can skip over Slug and Parent Topic — they’re not needed.
11. In the the “Description” field. you can add any instructions that are relevant to the Topic, e.g. “For general inquiries, please use our team mailbox team@ofm.wa.gov.”

12. Click “Submit”

13. To delete, click “Delete.” The count column can be useful information at this point — it shows you how many contacts are tagged with this topic and hyperlinks you to a list view of them all.

Tip: If you need to Edit the entry at any time, you can do that from here by clicking Edit.