


Content Types Instructions
In This Section
Central Annexations
Verify / Edit a Central Annexation entry
Tip! When creating a new Central Annexation entry, we recommend uploading your files to the Media Library before creating the new entry.
To verify existing annexation data is correct or update it:
1. Navigate to the Central Annexations posts section

2. Select and click a post title to open the edit options

3. Verify the Title field is correct
To edit: Click into the field to type/edit the text
Format = City – Ordinance Number – Date Received

4. Verify the City field is correct
To edit: Click into the field to type/edit the text

5. Verify the Year field is correct
To edit: Click into the field to open the dropdown options and select the correct Year
Note: you can also type to search and select the correct Year

6. Verify the County field is correct
To edit: Click into the field to open the dropdown options and select the correct County name
Note: you can also type to search and select the correct County name

7. Verify the Ordinance Number listed is correct
To edit: Click into the field to type and update the text

8. Verify the Date Received field is correct
To edit: Click into the field to open the date picker, then select the correct date and click Close to save

9. Verify the Effective Date field is correct
To edit: Click into the field to type to edit or using the open the date picker select the correct date and click Close to save

10. Verify the Approval Date is correct
To edit: Click into the field to type to edit or using the open the date picker select the correct date and click Close to save

Adding and Updating Files
The following file fields all have the same verification / editing process
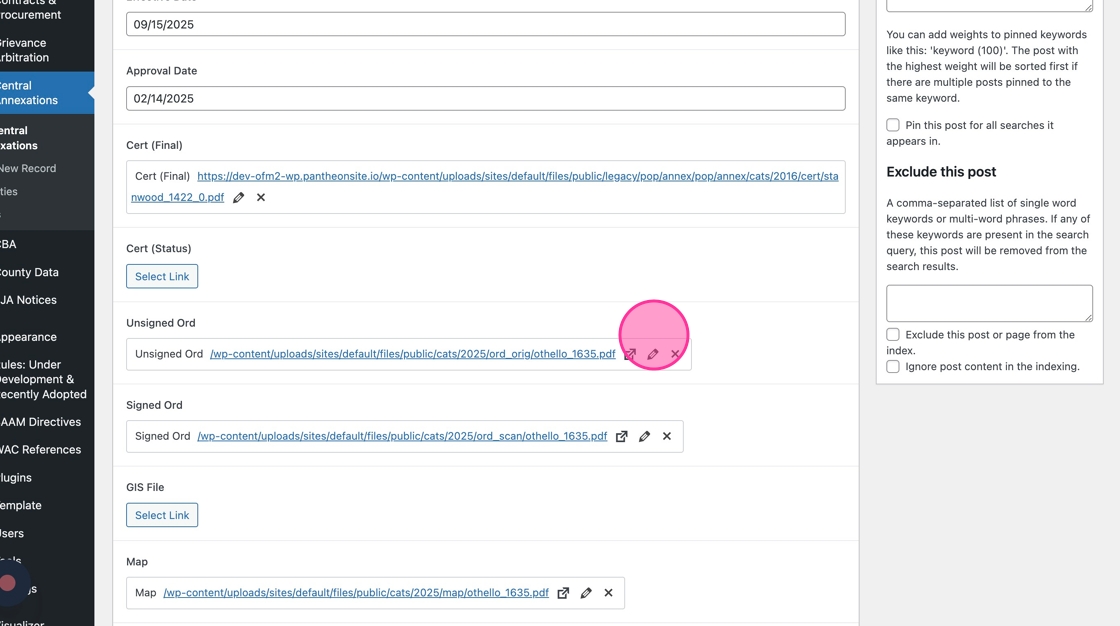
- Cert (Final)
- Cert (Status)
- Unsigned Ord
- Signed Ord
- GIS File
- Map
- Parcel Numbers
- Situs Addresses
To add a new file
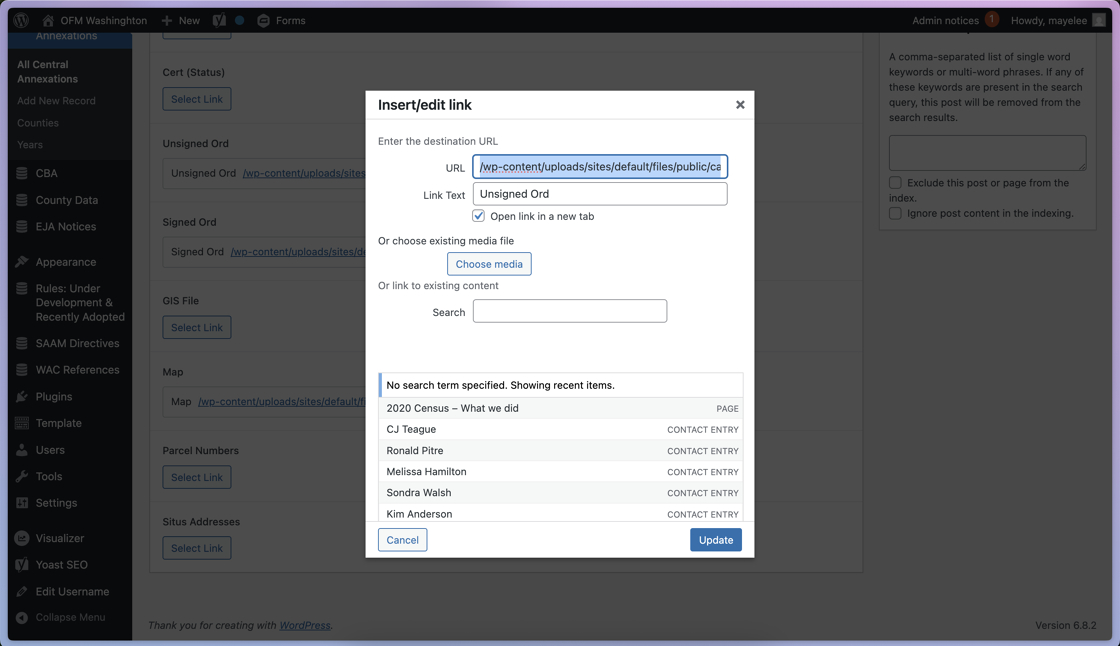
- Click the “Select Link” button to open the Insert/edit link menu

2. To choose a file from the Media Library, click Choose media button

3. Quickest method: use the Search Media box to find the search by file name

4. Click to select the correct file to use for this field.
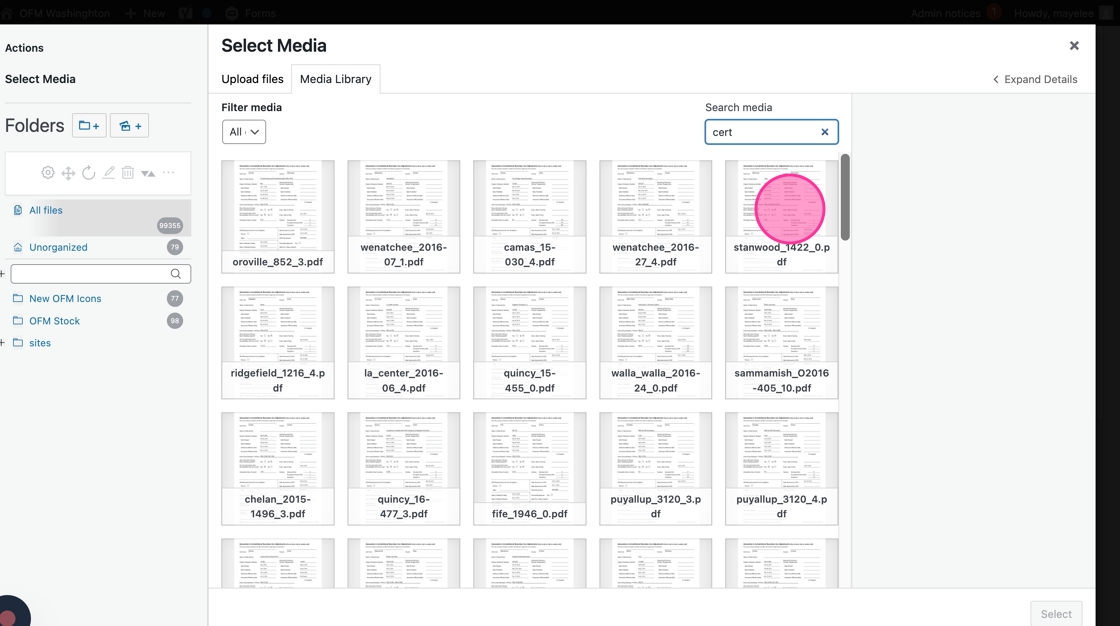
5. Click “Select” to save and add the selected file to the field

6. Click into the Link Text field to add the text that will hyperlink the file
Note: this will likely be the same as the Title of the field name (e.g. Cert (Final))

7. Click “Add Link” to save these file link changes

To update an existing file
- Click the Pencil icon to open the Insert/Edit Link settings.
2. Repeat the same steps as above for find a link to a new file
Save your work!
Click Update to save any changes made to the post

Create a new Central Annexation Entry
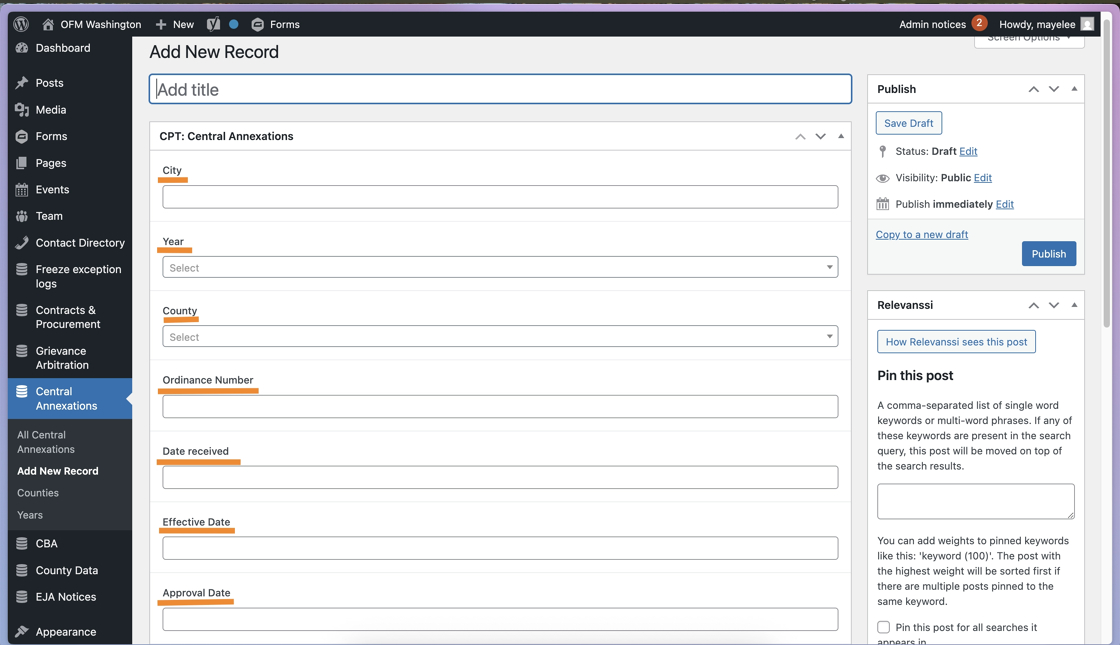
If you need to create a new Central Annexation Entry, you’ll follow the same steps but you’ll be adding content to empty fields.
To start, click the Add New Record button.

And add the details for the Central Annexation entry as described above.
Note: Title Format = City – Ordinance Number – Date Received
CBA (Collective Bargaining Agreements)
Verify / Edit a CBA
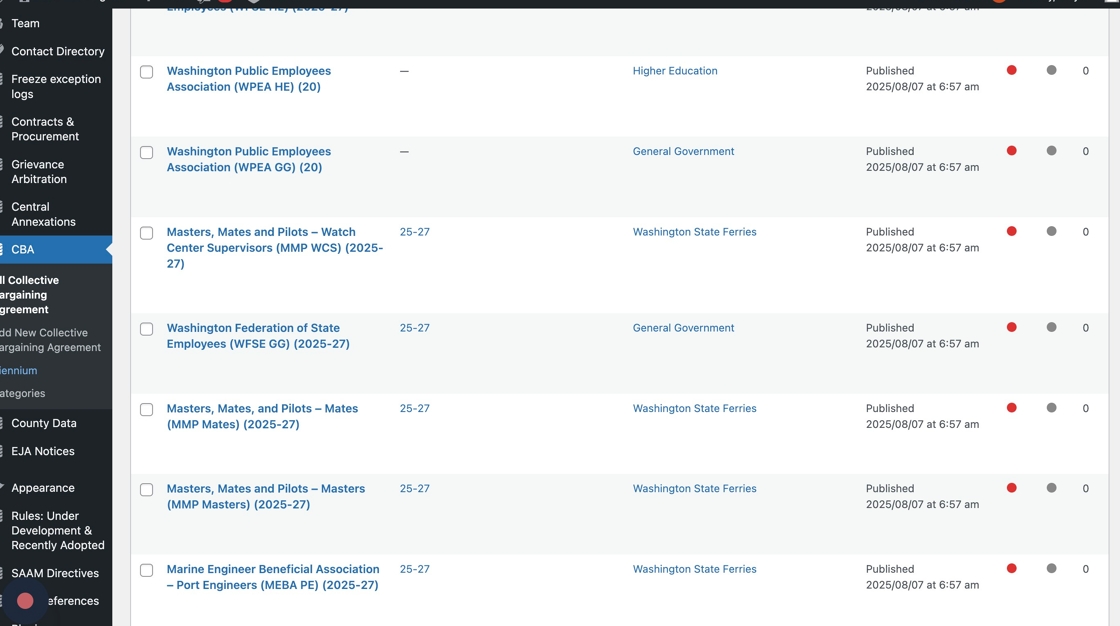
1. Navigate to the CBA content type section.

2. Click on a CBA post’s title to open the post’s editing options.

3. Verify the Title field is correct.
To edit, click into the field to type the correct CBA Title.
Note: the Title will be displayed on the list page, so each agreement should follow the same title format.

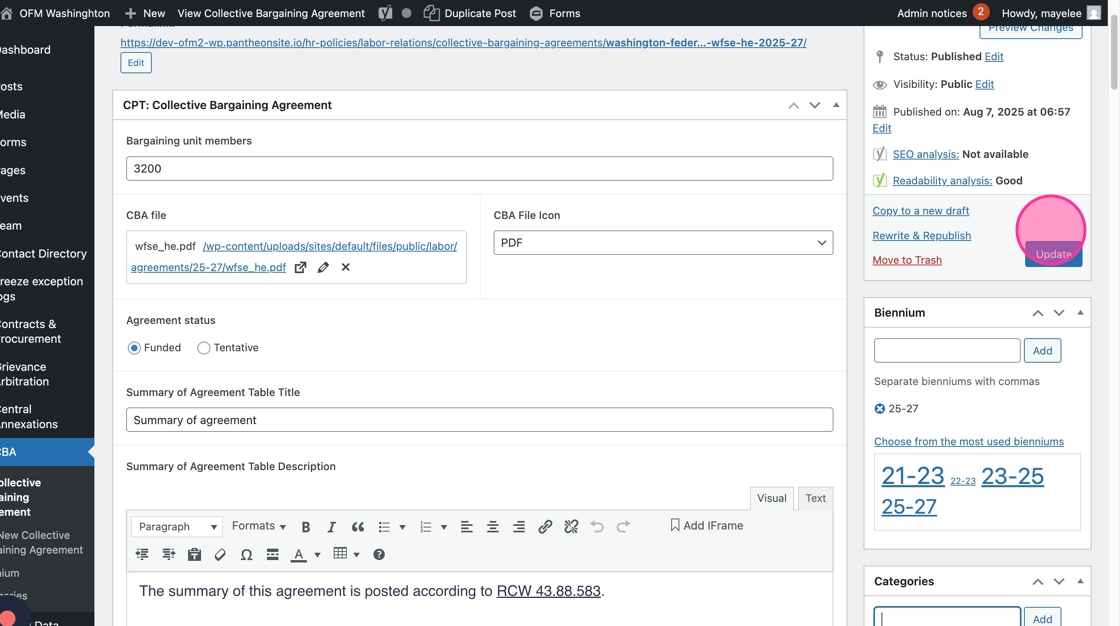
4. Verify total number of Bargaining Unit Members is correct.
To edit, click into the field to type the correct number.

5. Verify the CBA file’s Title and Link are correct.
To edit, click the Pencil icon to open the settings.

6. To edit the Title of the file, click into the Link Text field and type the correct Title
To edit the File link, there are two options:
- Click into the URL field to add a direct link
- Click Choose Media to open the Media Library assets
- Search or select the correct file from the Media Library
To save any changes, click Update.

7. Verify the correct file Icon is selected

8. To edit the Icon, click the dropdown arrow to view and select the correct option.

9. Verify the correct Agreement Status radio dial is selected.

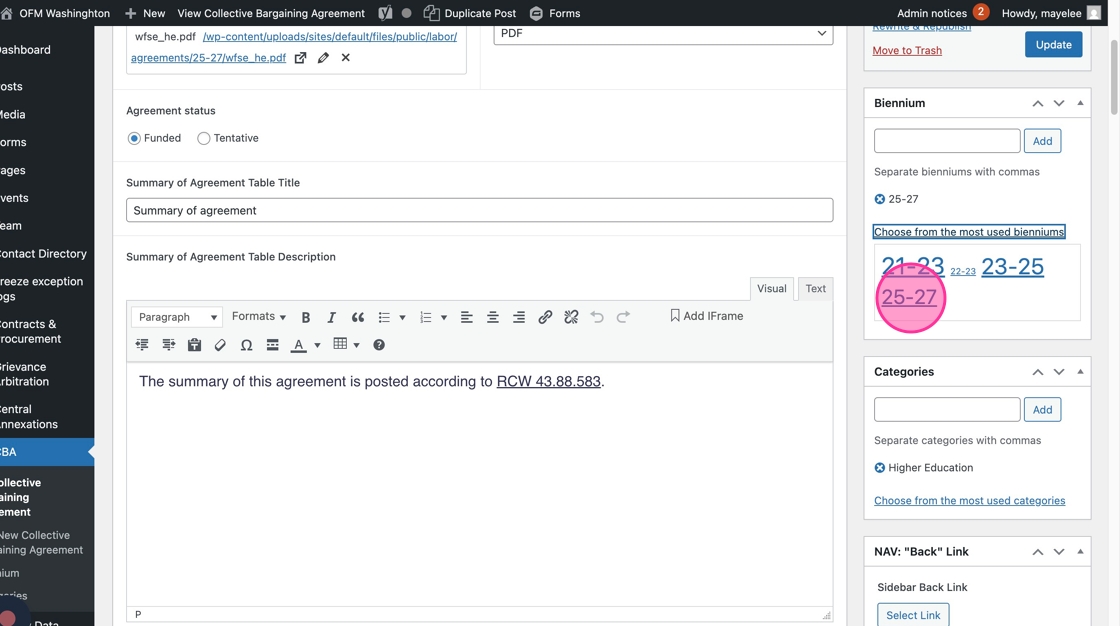
10. Verify the Summary of Agreement Table Title is correct.
To edit, click into the field to adjust the name of the Table.

11. Verify the Summary of Agreement Table Description is correct.
To edit, click into the Text Editor to adjust the content as needed.

12. Verify the Summary of Agreement Table content is correct in each row.

13. Verify each row’s Column Name is correct.
To edit, click into the text field to adjust what that row should be named.

14. Verify the Column Content for this row is correct.
To edit, click into the Text Editor field to type the correct content.

15. If an existing link needs to be edited, click into the underline phrase to see a quick view of the link.
Click the Pencil icon to open the Link Settings.

16. Click the Gear Icon to open the full link settings pop-up.

17. Similar to a previous Link step, you can edit the file link with the URL field.
To edit, click into the field and type in the correct link.

18. To edit the Title of the link, click into the Link Text field and type the Title.

19. Instead of the URL field, you can also click the Choose Media button to open the Media Library and select the correct asset.

20. In the Media Library, you can Search by file name or sort by the left column Folders.
Once you find the asset, click to select the file and click the Select button to add to the link settings.

21. To save your Link and Title settings, click the Update button.

Tip: Steps 13-21 should be repeated for the remaining Summary of Agreement Table rows.
If you do not need to add new rows to the table, skip to Step 26 to continue verification.
22. If you need to add a row to the Summary of Agreement Table, click the Add Row button

23. Click into the Column Name text field to add the new name.
Click into the Column Content text editor to add the text link(s).

Tip: You can repeat these two steps as often as needed to create more table rows.
24. To remove a row, click the minus ‘–’ symbol to review the double removal prompt

25. Click “Remove” to confirm the deletion of the row.
Note: Removing rows requires double confirmation to make sure you actually want to delete the content.

26. Verify the Biennium tag is correct.
To edit, click “Choose from the most used…” and select from the list of tags.

27. Click on the tag to assign the post to the Biennium.
28. Verify the Category tag is correct. Category tags are used to sort the CBAs into their respective groups (e.g. General Government)
To edit, click “Choose from the most used…” and select from the list of tags.

29. Click to assign the Category tag to the post.

30. Did you select the wrong tag? No problem!
To remove a tag, click the red X option by the tag to delete the selection.

31. If you need to, choose a new tag from the most used list.

32. Once you’ve finished verifying / editing the fields, click “Update” to save all changes on this CBA post.
To update a CBA entry with its Reopened Agreement content, you’ll navigate back to the CBA entry to edit.
- Add the Reopened Agreement File
- Select the Reopened File Icon
- Select the Reopened Agreement Status (funding)

Create Tags for CBA Entries
1. Navigate to the CBA (Collective Bargaining Agreement) section
2. Click “Biennium” to go to the list of Biennium tags

3. To add a new Biennium tag, click into the Name field and type the Biennium label.

4. Click the “Add New Biennium” button to save your new Biennium tag.
Note: you will see the new tag in the list to the right

Tip: Only needed to make a Biennium tag? Then you’re all set!
If you also need to create a new Category tag, continue on to the next step.
5. Click Categories to create a new Category tag

6. Click into the Name field to type the new Category tag. Click the Add New Category button to save the changes
Note: you will see the new tag in the list to the right

Once the tags are added, these will become dropdown options in a Collective Bargaining Agreement entry.
Add New Collective Bargaining Agreement
1. To create a new Collective Bargaining Agreement, you can do so from the menu on the left-had side.

2. Or, once you click into Collective Bargaining Agreement, you can click “Add New Collective Bargaining Agreement”

Contracts & Procurement
Below are two guides: the first outlines how to create a new Contract & Procurement entry, the second outlines how to update it with an Awarded Bid.
Automatic organization / deletion rules
- Procurement Type entries will automatically un-publish at the end of the Expiry Date field
- Entries will move to the Awarded Bids table as soon as an Announcement Date is added
- 90 days after the Announcement Date, the entry will automatically un-publish
- Sole Source Type entries will automatically un-publish after 15 days
Create a new Contract & Procurement Entry
Tip: We recommend uploading the necessary documents you’ll be adding to these entries to the Media Library, prior to starting the population of a new entry.
1. Navigate to the Contracts & Procurement section of the admin panel

2. Click the “Add New Contract & Procurement” button to open a blank entry

3. Click the “Add title” field to type in the name of the Contract / Procurement

4. Click the correct radio dial to select if this entry is a Procurement or Sole Source type.
Note: the type selection will indicate what kind of removal/delete logic should be applied to the entry. See Automatic organization / deletion rules above for more details.

5. The radio dial is default selected to Procurement, to update to Sole Source, select that radio dial option.
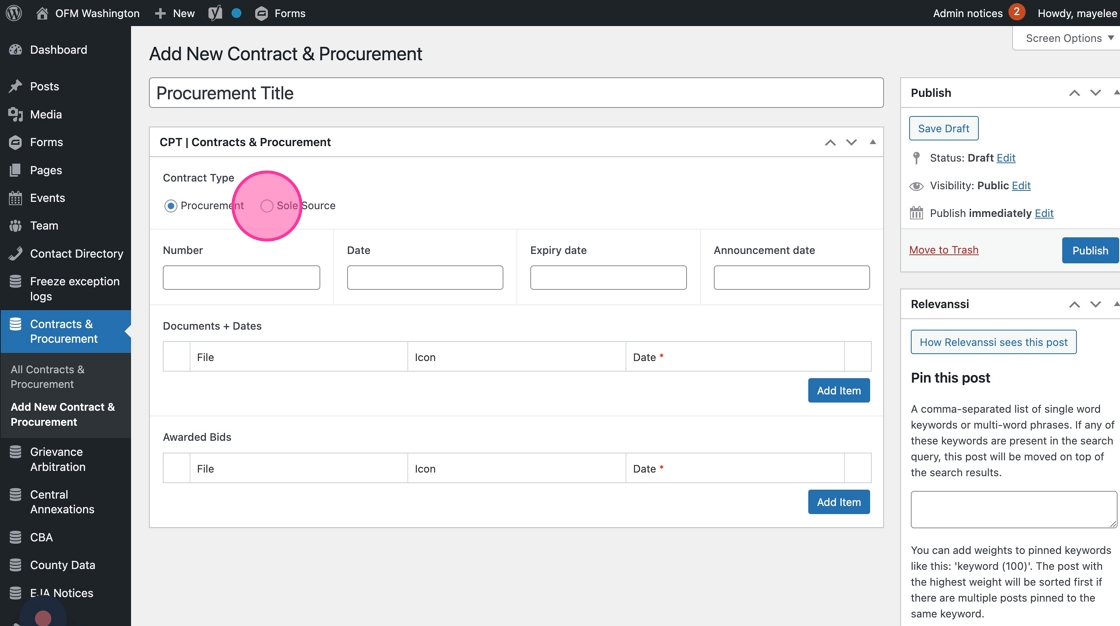
6. Click the “Number” field to type in the number of the entry (e.g. RFP 23-200)

7. Click the Date field to open the date picker — this is the Contract Date field

8. Type in the date or use the date picker to select the appropriate date.

9. To add an Expiry Date, click into the field to type the date.

10. Or select the date using the Date Picker.
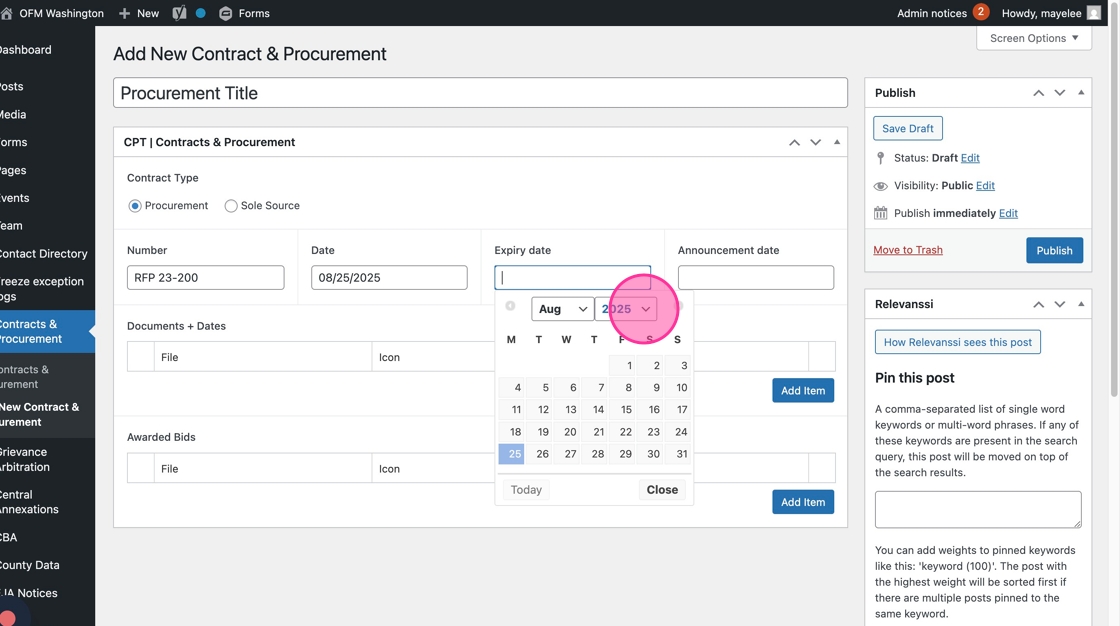
11. To add the corresponding Documents, click the Add Item button to open an empty set of fields.

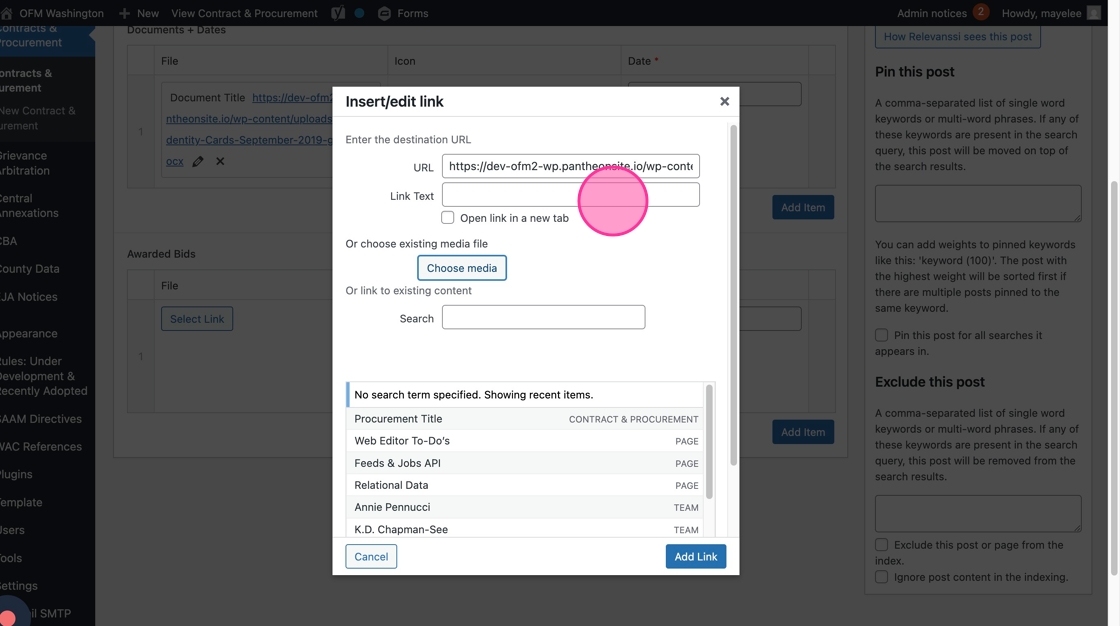
12. Click the “Select Link” button to open the Link/File settings

13. We recommend clicking the Choose Media button to open the Media Library and select the document to display.

14. You can use the Folders to find the document or the Search Media field to search by file title.
Once you find the correct file, click the square thumbnail to choose the asset.

15. Once selected with the blue checkmark, click the Select button to add it to the entry. This selection will populate the URL field with the correct link.

16. Click into the Link Text field to edit the public-facing site’s link name

17. Once those two fields have been populated, click the Add Link button to save those updates to the entry.

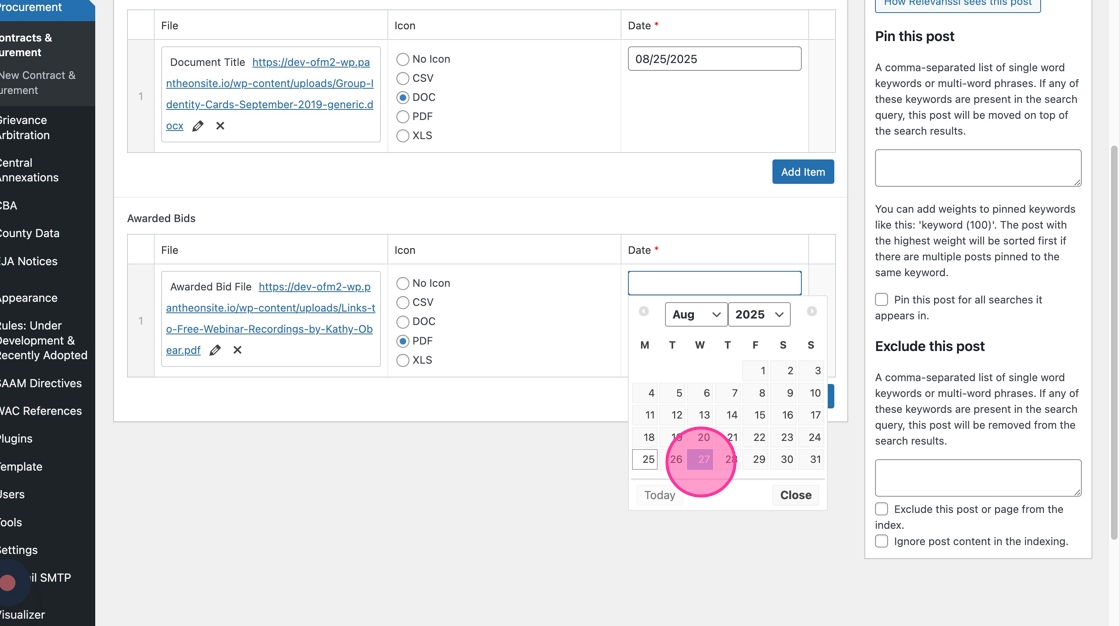
18. Based on the File type you just added, select the correct Icon to be displayed by clicking the corresponding radio dial.

19. Click into the Date field to add the date for this document, either by typing it in

20. Or, you can use the Month and Year dropdown options or arrows to find the date for the document.

21. Repeat Steps 11-20 to add additional Documents + Dates.

22. If you add a Document row that you no longer need, click the minus ‘–’ symbol to prompt the removal

23. Double confirm by clicking the red Remove button and the row will be removed. (Proceed with caution: this cannot be undone!)

24. Once all updates have been added to the page, click the Publish button to display it on the website.

Tip: Remaining fields will be filled in at a specific time, based on the awarded bid approval. Read the next guide to learn how to add to those fields.
Update Contracts & Procurements to Awarded Bids
Tip: We recommend uploading the necessary documents you’ll be adding to these entries to the Media Library, prior to starting the population of a new entry.
1. Once a Contract & Procurement entry has been awarded, you will go into the same entry to add to those necessary fields.
2. Navigate to the Contracts & Procurement section of the admin panel.

3. Find the correct Contract & Procurement entry, click the Edit option.

4. Review the previously filled fields to confirm everything is correct.
Click into the Announcement Date field to add the date, either by typing it in

5. Or by using the Month and Year dropdown options or arrows to find and select the correct Announcement Date

6. Add the appropriate documents to the Awarded Bids section; click the Add Item button to open an empty document row

7. Click the “Select Link” button to open the Link/File settings

8. We recommend clicking the Choose Media button to open the Media Library and select the document to display.

9. You can use the Folders to find the document or the Search Media field to search by file title.
Once you find the correct file, click the square thumbnail to choose the asset.

10. Once selected with the blue checkmark, click the Select button to add it to the entry. This selection will populate the URL field with the correct link.

11. Click into the Link Text field to edit the public-facing site’s link name.
12. Once those two fields have been populated, click the Add Link button to save those updates to the entry.

13. Based on the File type you just added, select the correct Icon to be displayed by clicking the corresponding radio dial.

14. Click into the Date field to type the date or open the Date Picker for this document.

15. You can also use the Month and Year dropdown options or arrows to find the date for the document.
16. Repeat Steps 6-15 as needed to add additional Awarded Bids documents.

17. If you add a Document row that you no longer need, click the minus ‘–’ symbol to prompt the removal.

18. Double confirm by clicking the red Remove button and the row will be removed. (Proceed with caution: this cannot be undone!)

19. Once you’ve added the necessary Awarded Bid details, click Update to save those changes.

County Data
County Data posts: Verify / Edit
1. Navigate to the County Data section of the admin panel.

2. Select the County Data post to review / edit.

3. Verify the post Title field is correct.
To edit, click into the field to type in the correct Title.

4. Verify the County Data post’s description is correct.
To edit, click into the Text Editor field to adjust the content as needed.

5. Next up, the County Data Content fields, which display above the County Data Accordion text.

First field to verify is the Title of the County Data Content field.

6. Then, verify the Description field content is correct. This field is optional. To edit, click into the Text Editor field to add content.
Next we’ll do Items. Items are displayed as Accordion trays that expand/collapse on the public-facing site.

These next steps will review how to verify the Tray content and how to add/delete Tray rows.
7. Verify the Tray Title is correct.
To edit, click into the text field to edit the Title.
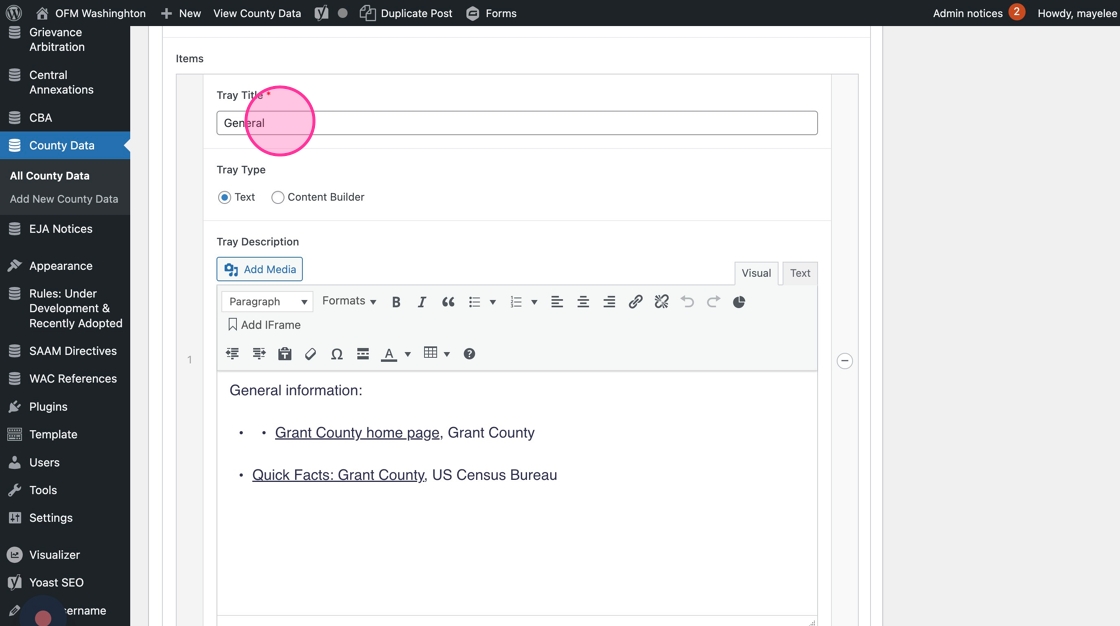
8. Verify the Tray Type.
To edit, click the correct radio dial option.
Note: for the verification process, these will likely always be Text as everything we populated from Drupal came over as text. In the future you may want to use a Content Builder to use additional modules beyond the text editor.

9. Verify the Tray Description field has the correct content.
To edit, click into the Text Editor field to edit as needed.

10. Repeat the same verification process for the Tray Title, Tray Type, and Tray Description field on the remaining Tray rows.
Tip! If all Tray Items are verified, you can skip to the last step to save all changes on the County Data post.
11. If you need to add another Tray row, you can click Add Item to create an empty row.

12. Click into the Tray Title field to add the Accordion Tray Title.

13. Select the Tray Type you will be displaying in the tray.

14. Click into the Tray Description Text Editor to add the necessary content for that tray.

Tip: Repeat these steps to add multiple new Tray rows, as needed.
15. If you need to delete a Tray row, you’ll click the corresponding minus ‘–’ symbol

16. Then, confirm by clicking the Remove link, which delete the content.
Removing content rows requires double confirmation, as a precaution.

17. Click Update to save all changes on the County Data post.

Environmental Justice Assessment Notices
Submitting an Environmental Justice Assessment Notice
To submit a notice for review, please fill in the Notice Form on this page.
To edit a notice, please review the step-by-step instructions below.
Environmental Justice Assessment Notices
After notices are viewed, they will be published in a table.
Edit a published Environmental Justice Assessment Notice
To access the EJA Notices, login to the admin panel through SSO at this link.

1. Navigate to EJA Notices content type in the admin panel

2. Click to open the entry you need to edit/update

3. To edit the Title field, click into the top field to change its Title

4. To edit the Category, click into the dropdown menu to open the available options.
Click to select the category that the entry should be assigned

5. To change the Submitted Date, click into the field to open the Date Picker

6. Use the Month and Year dropdown options or the arrows to adjust the Date fields

7. Click into the Agency Name dropdown to open the options to change the agency for this notice.

8. To edit the Agency Action name and link, click the Pencil icon to open the Settings menu.

9. In the Settings menu, you can edit the URL and the Link Text as needed.
Click into the text fields to edit/adjust as needed. Then, click the Update button to save your changes.

10. To edit the Description, click into the Text Editor field — type to adjust as needed.

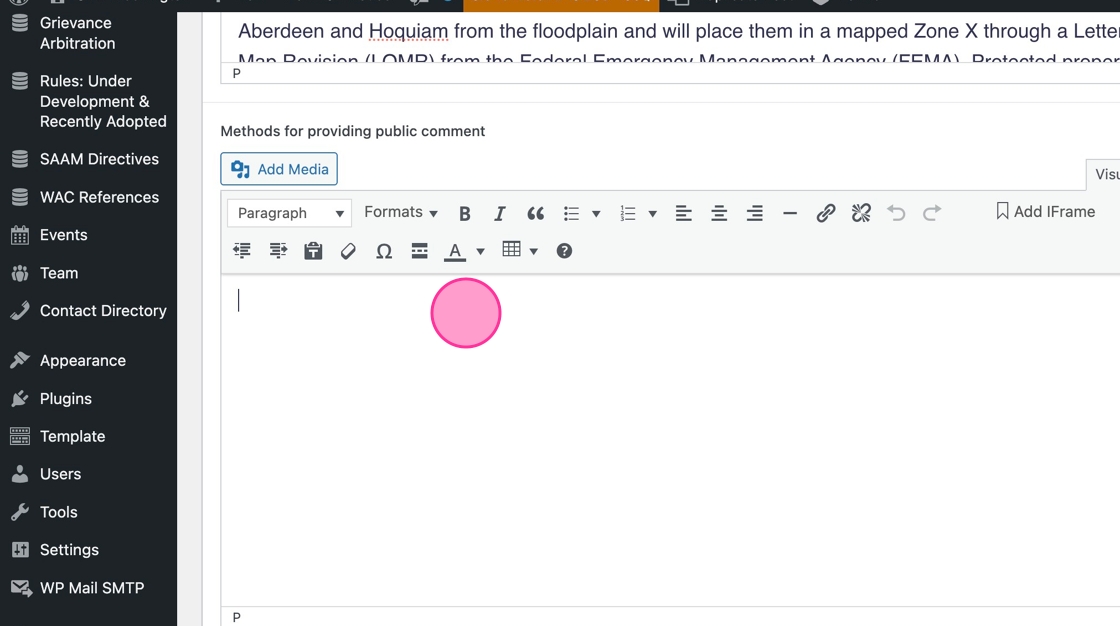
11. To edit content related to the Methods for Providing Public Comment, click into the Text Editor field to adjust as needed.
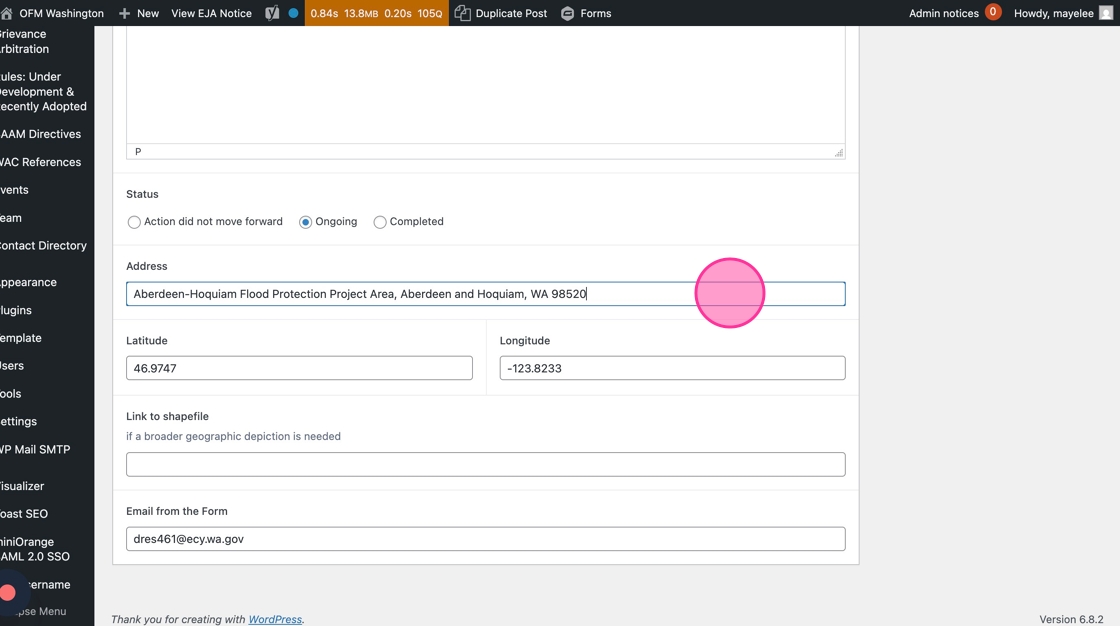
12. If the Category selected is related to a Capital or Transportation Project, then there will be 3 additional fields to edit:
- Address
- Latitude
- Longitude
These fields will be available to edit (click into each to adjust), if the conditional logic is met based on the Category selection.
13. Click into the Link to Shapefile field to edit the content as needed

14. Click into the Email From the Form field to edit as needed (you should not need to adjust this)

15. To update the Notice Status, click to select the necessary radio dial option.
- If you select the Completed option, it will open additional fields to be populated/edited
- If you select the Action did not move forward option, it will open additional fields to be populated/edited

16. When the “Action did not move forward” option is selected, an additional field will display so you can explain why the action did not move forward.
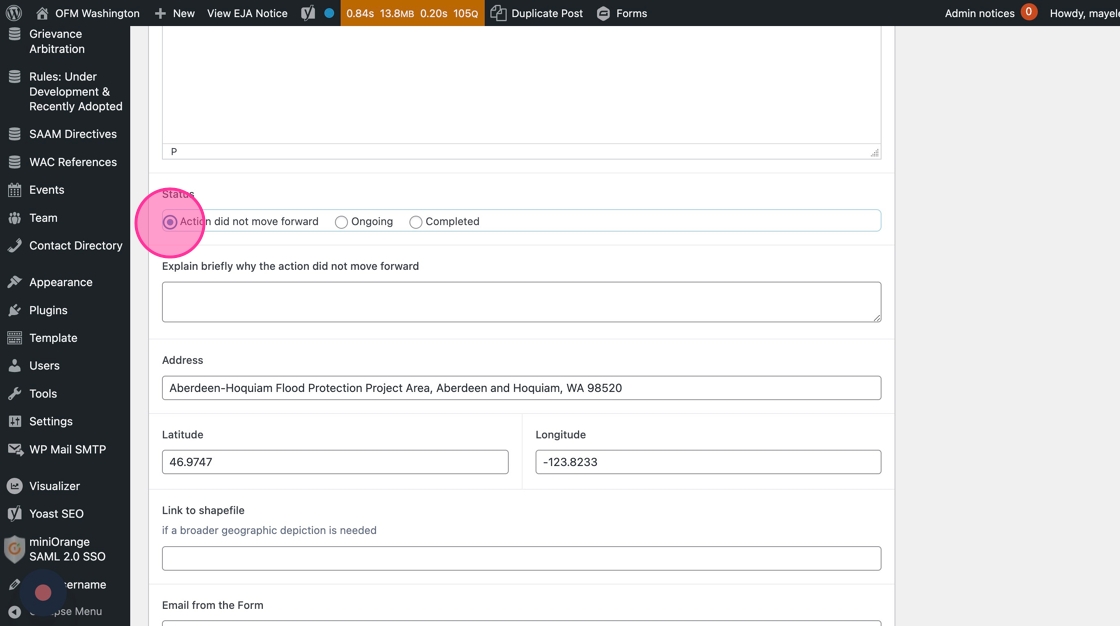
17. Click into the text box to make any edits when this status option is selected.

18. If the Status should be set to Completed, click that radio dial to update.
This option will open 3 additional fields to be populated.

19. Click into the “Date completed” field to open the Date Picker and edit the completed date as needed
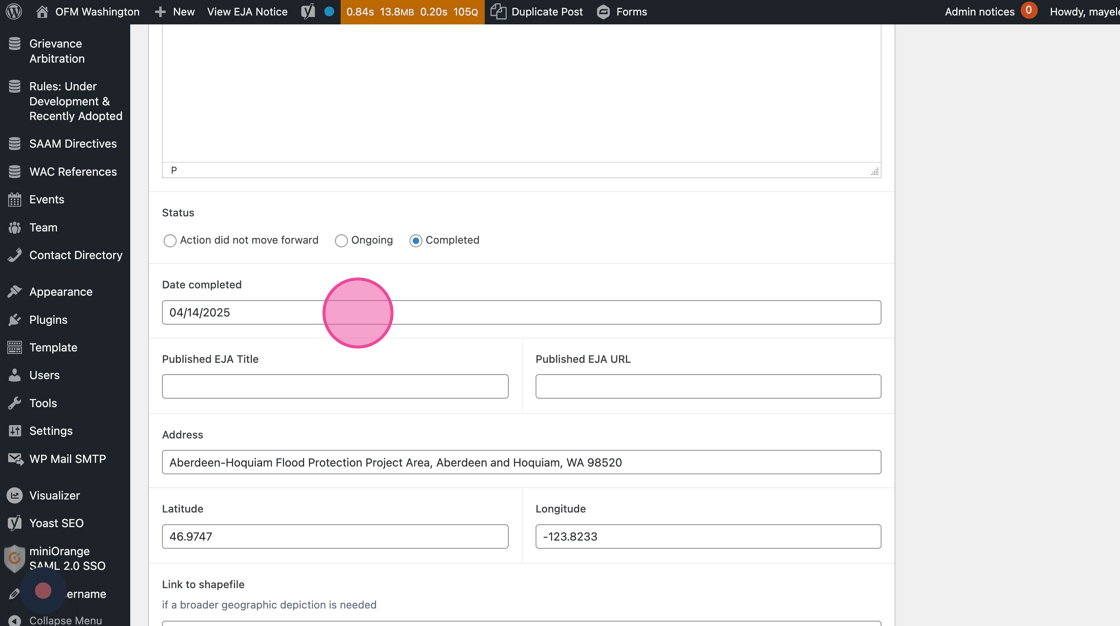
20. Click into the Published EJA Title and the Published EJA URL fields to type in the necessary text for each

21. Once all changes have been updated, click the Update button to publish the changes to the frontend Notice.

Freeze Exception Logs
Create a Freeze Exception Log Entry
Note: Please upload your Freeze Exception Log file to the Media Library before creating your Log entry.
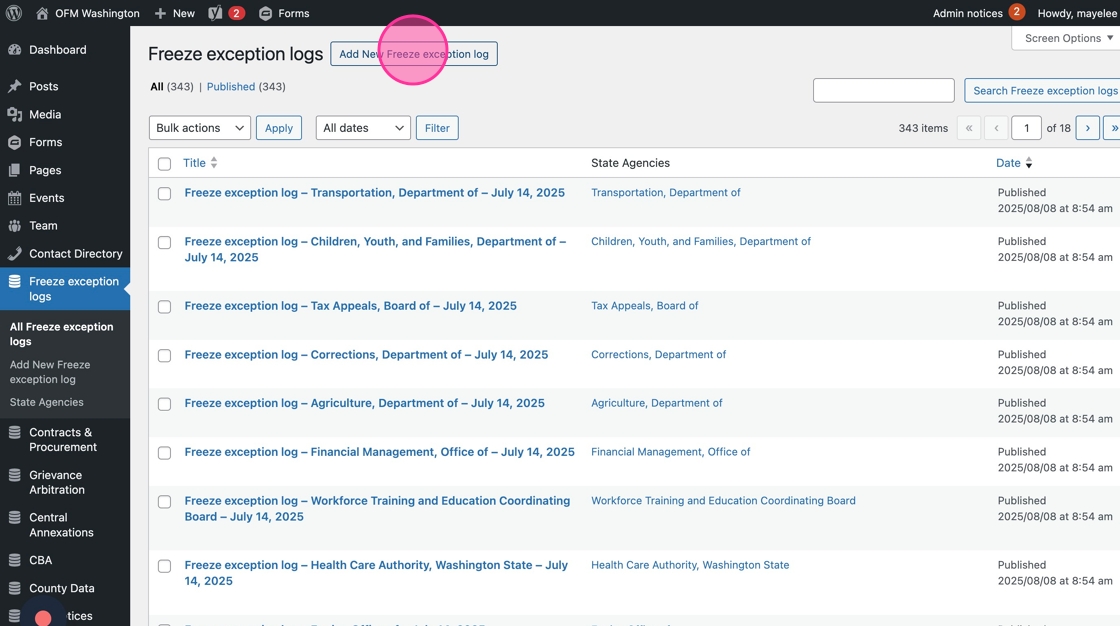
1. Navigate to the Freeze Exception Logs section of the left panel.

2. Click “Add New Freeze exception log” to open an empty Entry.
3. Click the “Add title” field to name this entry so other web editors can find it. We recommend titling the Log Entry with its Agency name – Date
Note: this field does not display on the public-facing website.

4. Select the correct State Agency, click the field to open the dropdown selection.

5. Start typing or scroll to the correct State Agency, click to select the agency name.

6. Add the Date this Log was submitted.

7. You can type it in or use the Date Picker’s Month and Year dropdown options or Arrows to get to the select the correct date.

8. Add the corresponding Log File to this Entry, click Select Link to open the File/Link Settings.

9. Click the Choose Media button to open the Media Library.

Alert! There are multiple ways to add the correct link/file, these next steps outline two common methods.
10. Option 1: Navigate to the Folders and sort through to find the Freeze Exception Logs folder (based on the previous Drupal foldering system). This can be challenging if the folder is deeply nested — as the titles are cut off in this view.

11. Find and open the correct folder to see the thumbnail options populate in the Media Library list.

12. Option 2: Use the Search media to search by the File Name.

13. Find the correct File, click the thumbnail to highlight the selection.

14. Click the Select option to add it to the Settings menu.

15. Click into the Link Text field to add/edit the link text for the File.
Generally, you’ll want to use the File name, e.g. State Agency Freeze Exception Log MM.DD.YYYY
Note: Link Text has to be populated to be in WCAG compliance for accessibility – links need text to show what is being clicked.

16. After the fields are populated, click the Add Link button to add the file and title to the Log Entry.

17. Based on the File format selected, select the correct Icon radio dial option.
This will add the File Type icon on the public-facing site.

18. Click the Publish button to add this Log Entry to the Freeze Exception Logs Table page.

Create a new State Agency tag option
To create the selection that get displayed in a dropdown menu, they have to be added to the related Content Type section.
If/when a new State Agency is added as an option for the Freeze Exception Logs, then it will be added with these instructions.
1. Navigate to the “State Agencies” category option to create new State Agency tags.

2. To add a new State Agency option, click into the “Name” field.

3. Type the Agency’s name into the field
4. Click “Add New State Agency” to save the new agency option.

Grievance Arbitration Decisions
Review and edit Grievance Arbitration Decisions
1. Navigate to the Grievance Arbitration Decision posts.

2. Click on a Decision title to review and edit.

3. Verify the Decision title is correct. Note: this text does not display anywhere on the public-facing part of site, but used for web editors’ reference.
To edit, click into the field to change the text.

4. Verify the Agency field has the correct agency listed.

5. To edit: Click the dropdown field to select the correct Agency; you can also type to search and select.
Note: to delete the listed agency, click the X to clear the selection.

6. Verify the Union field has the correct union listed.

7. To edit: Click the dropdown field to select the correct Union; you can also type to search and select.
Note: to delete the listed union, click the X to clear the selection.

8. Verify the Biennium field is correct.

9. To edit: Click the dropdown field to select the correct Biennium; you can also type to search and select.
Note: to delete the listed biennium, click the X to clear the selection.

10. Verify the Decision date field is correct.

11. To edit: click into the field to open the date picker and click on the date you want to select; you can also type it in.

12. Verify the Grievant Last Name field is correct.
To edit: Click into the text field to type the correct Last Name.

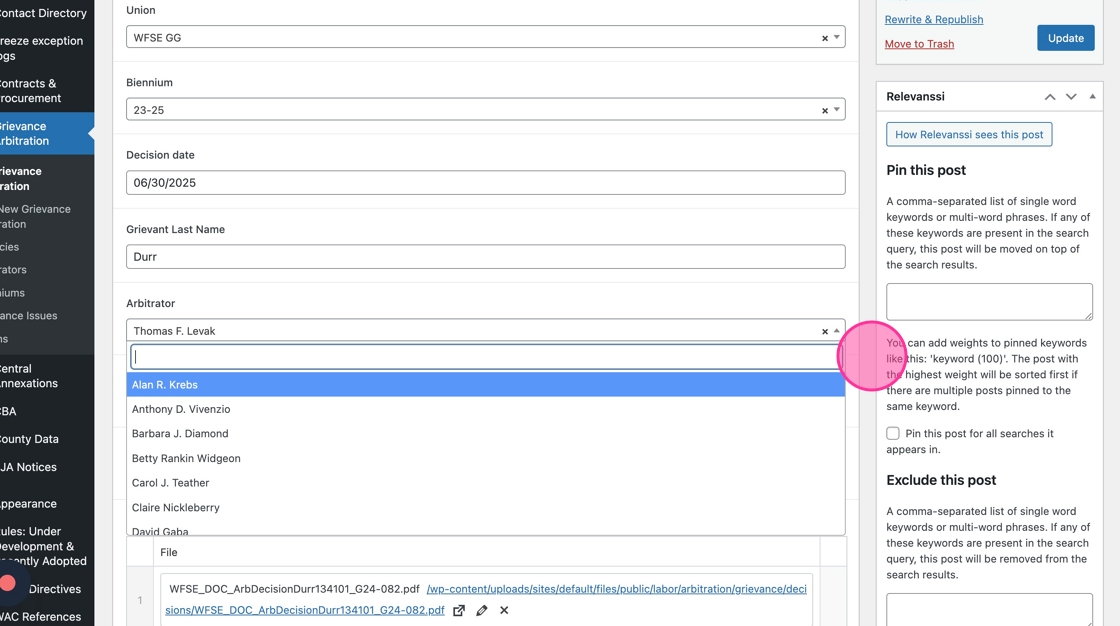
13. Verify the Arbitrator selection is correct.

14. To edit: Click the dropdown field to select the correct Arbitrator; you can also type to search.
Note: to delete the listed arbitrator, click the X to clear the selection.
15. Verify the Grievance Type selected is correct.
To edit: Click to select a different radio dial option.

16. Verify the Grievance Issue selection is correct.

17. To edit: Click the dropdown field to select the correct Grievance Issue; you can also type to search and select.
Note: to delete the listed Grievance Issue, click the X to clear the selection.

18. Verify the Listed files have the correct text and link.
To edit the listed file: Click the pencil icon to open the settings.

19. Verify the URL field and Link Text field are correct.
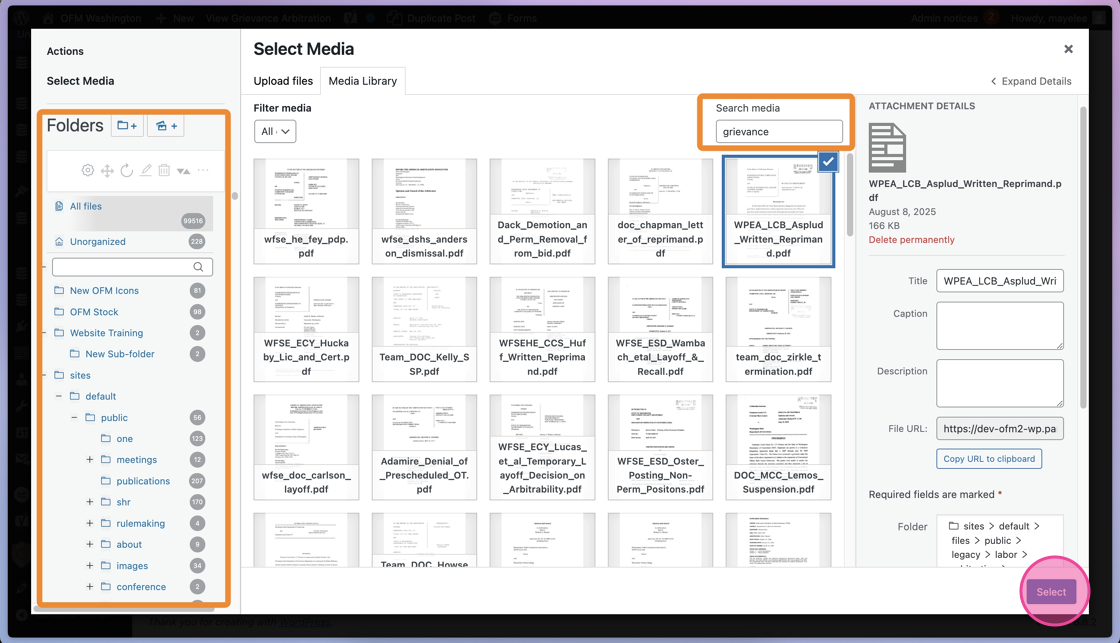
To edit, click the Choose Media button to open the Media Library to add a file.

20. In the Media Library, you can find the correct file through the Folders or by using the Search Media field.
Once found, select the thumbnail and click the Select button to add it to the Decision document field.
Tip: If you don’t need to add additional documents, skip to Step 23 to complete your verification.
21. To add a new file: click the Add Document button open the settings.

22. You can add a direct URL link or click the Choose Media button to open the Media Library and select a file there.
To edit the Link Text, click into the field to type how the Link will be labeled on the public-facing site.
To save those changes, click the Add Link button to add to the Decision.

23. To complete verification / save edits, click Update.

Tip: If you are only verifying Decision entries, you can skip the remaining steps.
Create a new Grievance Arbitration Decision
- To create a new Grievance Arbitration Decision, click the Add New button.

2. A blank Grievance Arbitration Decision entry will open with empty fields.
Add/edit the correct content in each field — similar to the previous steps of this guide.

Adding new categories
The dropdown selections are created in their own tag groups and are pre-filled from the Drupal site.
If you need to create new options within the dropdown selections, you’ll follow these steps for each dropdown field’s editing options.
These instructions cover adding content to each Category — you might not need to add content to each of the Categories. Only add/update as needed.
Agency
1. To add a new Agency to the dropdown menu, click Agencies.

2. Click the Name field and type the Agency name needed.

3. Click Add New Agency to save your new Agency name.

Arbitrator
1. To add a new Arbitrator dropdown option, click Arbitrators within the Grievance Arbitration section.

2. Click into the Name field to type the Arbitrator name.

3. Click “Add New Arbitrator” to save the new name.

Biennium
1. To add a new Biennium dropdown option, click the Bienniums section within Grievance Arbitration.

2. Click into the Name field to type the new Biennium option. Follow the same format: YY–YY

3. Click “Add New Biennium” to save the new option.

Grievance Issue
1. To add a new Grievance Issue dropdown option, click the Grievance Issues

2. Click into the Name field and type the new Grievance Issue option.
3. Click “Add New Grievance Issue” to save the option.

Union
1. To add a new Union, click the Unions section within the Grievance Arbitration section.

2. Click into the “Name” field to create a new dropdown option.

3. Click “Add New Union” to save the option.

Rules: Under Development & Recently Adopted
How to Create a new Rule Under Development
There are two types of rules — Under Development and Recently Adopted. We’ll cover both in this guide, starting with Rules Under Development.
1. To create a new rule, navigate to the Rules: Under Development & Recently Adopted section of the admin panel.

2. Click the “Add New Rule” button to create a new Rule entry.

3. Click into the Title field to add the Rule’s title.

4. Click into the “Rule Subject” field to add the subject of the rule.

5. Click into the Filed Date field to open the Date Picker.

6. Type in the date or use the Month and Year dropdown options or the arrows to find the date you’d like to set as the Filed Date.

7. Click into the Rule Type dropdown field to select Under Development for the Type.

8. Add the Documents associated with the Under Development Rule entry; click the Add File to open those fields.

9. Click the Select Link button to open the File/Link Settings.

10. Click the Choose Media button to open and select from Media Library options.

11. Use the Folders or the Search Media field to find the correct document related to the Under Development Rule Type.
Note: in this example, we use the Folders to find the documents related to rules that are under development.

12. Select the correct document to be added to the Rule Entry, then click the Select button to add it to the entry.

13. Click into the Link Text field to add the text for to the Document Link. This is what the user will see and click.

14. Once those fields have been populated, click the Add Link button to save the changes to the Rule Entry.

15. Adjust the Icon option to reflect the File that was added by selecting the correct radio dial.

16. Click into the Date field to open the Date Picker that corresponds to the File added.

17. Type the date in or use the Month and Year dropdown options or arrows to find and select the correct date for the added File.

Tip: Repeat Steps 8–17 to add additional documents for the Under Development rule.
18. When the Under Development type is selected, there will be 3 additional fields to populate
- Rules Review Meeting
- Click into this field to type the necessary details for the meeting
- Comment Period Ends
- Click into this field to open the date picker
- Hearing Date
- Click into this field to open the date picker

19. Click Publish to save and publish the new Rule Entry.

Update a Rule to a Recently Adopted Type
For all Recently Adopted Rules, you will be always be updating an existing Under Development type rule with the respective Date and Documents.
1. Navigate to the Rules: Under Development & Recently Adopted section of the admin panel.

2. Find the Rule that you would like to update to the Recently Adopted type, click to open and edit.

3. Click the Rule Type dropdown field to update it to Recently Adopted.

4. You do this by simply clicking “Recently Adopted.” This selection will also move the rule to the appropriate table on the front end.

5. Click into the Effective Date field to open the Date Picker.

6. Type in the date or use the Month and Year dropdown options to select the date that this Rule is Effective.

7. If needed, click the minus ‘–’ icon to prompt the removal of the previous Under Development document(s).

8. Confirm the removal of the Document by clicking the red Remove option. Proceed with caution: this action cannot be undone. (If you accidentally delete a document, you will need to add it again.)

9. Add the updated Effective documents by clicking the Add File button to open the Document fields.

10. Click the Select Link to open the Link/File settings.

11. Click the Choose Media button to open the Media Library options.

12. You can use the Folders or the Search Media option to sort and find the document you’d like to add.

13. Select the thumbnail and then click the Select button to add the file to the Rule entry.

14. Click into the “Link Text” field to add the text for the Document link. This is what the user will see and click on from the front end.

15. Click the Add Link button to save these changes on the Rule’s Document.

16. Based on the select File, adjust the Icon radio dial as needed.

17. Click into the Date field to open the Date Picker selector.

18. Type in the date or use the Month and Year dropdown options or arrows to find and select the Document’s date.

Tip: To add additional documents, repeat Steps 9–18 for each document you need to add.
19. Click the Update button to save all changes for the Recently Adopted Rule.

SAAM Directives
Verify / Edit a SAAM Directive
There are two types of SAAM Directives — first we’ll cover SAAM Directives, then we’ll guide you through Superseded Directives.
1. To verify or edit a SAAM directive, navigate to the SAAM Directives section.
2. Click the Type column title to sort the SAAM Directives list by Directive type.

3. Hover over the post name, click Edit to open the post to review.

4. Verify the Icon field is correct.
To edit: select the correct radio dial option for the Directive file(s).

5. Verify the Type selected is Directive.

6. Verify the Directive Title and Link are correct; this is a dual-purpose field where the Title and Link will be displayed on the frontend site.

7. To edit, click the Pencil icon to open the settings.

8. To edit the Link, use the URL field to edit the destination by pasting in the new file path or link.

9. You can also click Choose Media to select the correct file from the Media Library.

10. You can also click into the Link Text field to update the Title. This field is what the user will see and click on the front end.
Click the Update button to save the changes for the Title and Link.

11. Verify the Directive Number is correct.
To edit, click into the field and type the correct number.

12. Verify the Date Issued is correct.
To edit, click into the field to open the date picker – you can type in the date or use the month + year dropdown or arrows to find and select the correct date..

13. Verify the “SAAM Policies Affected” field is correct.
To edit, click into field to type the correct content.

14. Click Update to save all changes.

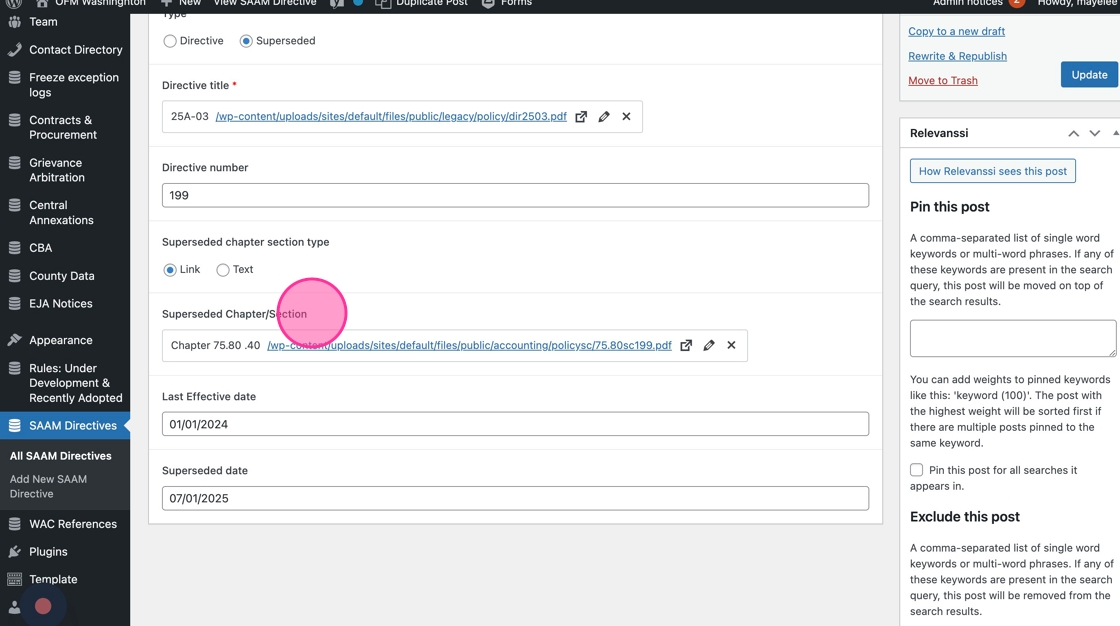
Verify / Edit a Superseded SAAM Directive
- To verify / edit a Superseded SAAM Directive, navigate to the SAAM Directives section of the admin panel.
2. Click the Type column title to sort the SAAM Directives by Superseded.

3. Hover over the post name and click Edit to open the post and review.

4. Verify the Icon field is correctly selected on the post.
Updating the radio dial button will add the icon to the post link; it should correspond to the file type being viewed.

5. Verify the Type of SAAM Directive is correctly assigned to Superseded.

6. Verify the Directive Title field is correct; this is a dual-purpose field where the Title and Link will be displayed on the frontend site.

7. To edit either of these, click the Pencil icon to open the Link settings menu.

8. To edit the Title: click into the Link Text field and type in your title.
To edit the Link: click into the URL field and add the link; OR click Choose Media to select from existing Media Library of files.
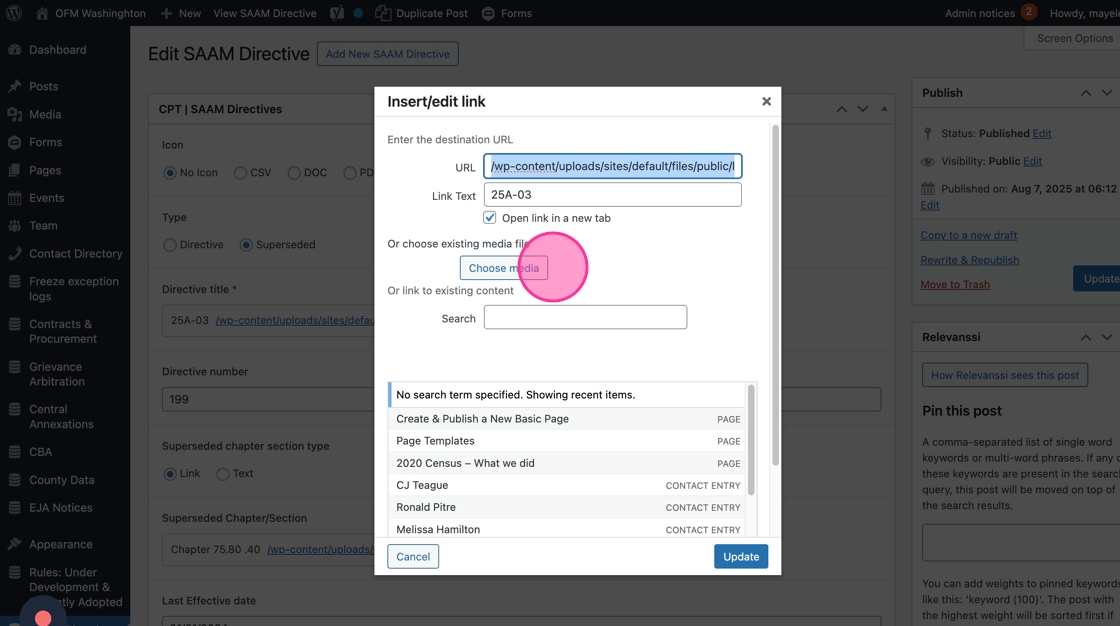
9. To save the changes, click the Update button

10. Verify the Directive Number is correct.
To edit, click into the field to type the number.

11. Verify the Superseded Chapter Section Type.
- The Link option will primarily be used for these posts — as they will typically have a chapter/section to link to.
- If there are no associated links for a chapter/section use Text and a plain text field will display.

12. If using Text, you can click into the text field to type the Chapter/Section.

13. If using Link, you will see the dual-purpose Title/Link field. In each, verify the Title and Link of the Superseded Chapter/Section is correct.
14. If the Title or Link are incorrect, click the Pencil icon to open the settings menu.

15. Similar to Step 7, click into the respective fields to edit the Title and Link:
- Title: click into the Link Text field and type in your title
- Link: click into the URL field and add the link; OR click Choose Media to select from existing Media Library of files.
Click Update to save your changes.

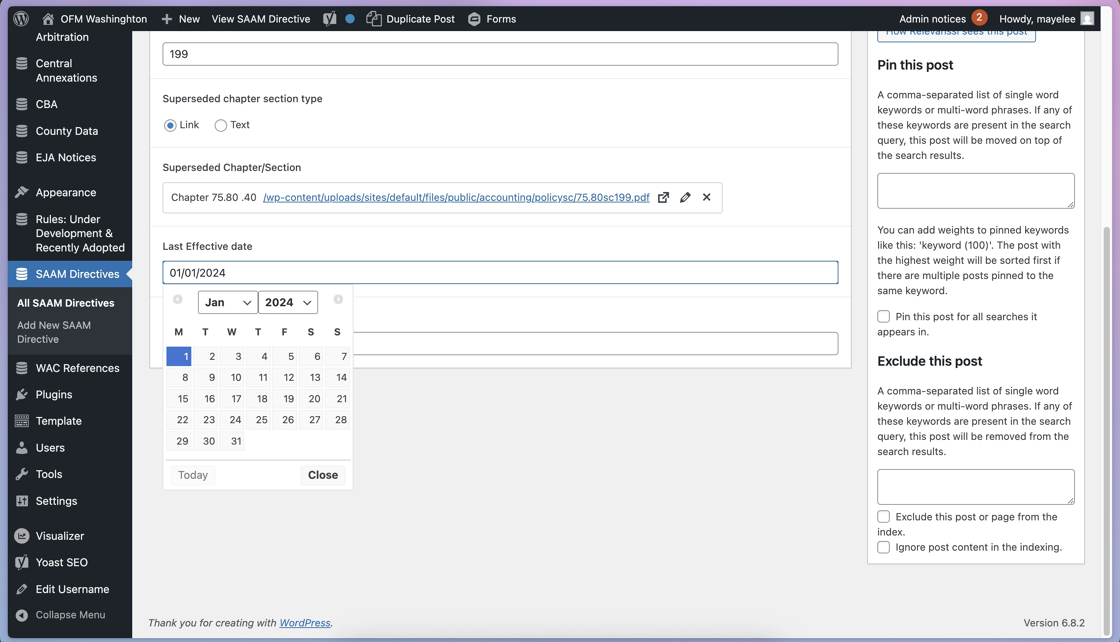
16. Verify the Last Effective Date is correct.
To edit, click into the field to open the Date Picker.

17. Type in the correct date, or use the month and year dropdowns, or arrows to find and click the correct date.
18. Verify the Superseded Date is correct.

19. To edit, click into the field to open the Date Picker.
Type in the date, or use the month and year dropdowns, or arrows to find and click the correct date.

20. Once all fields have been verified / edited, click Update to save the changes.

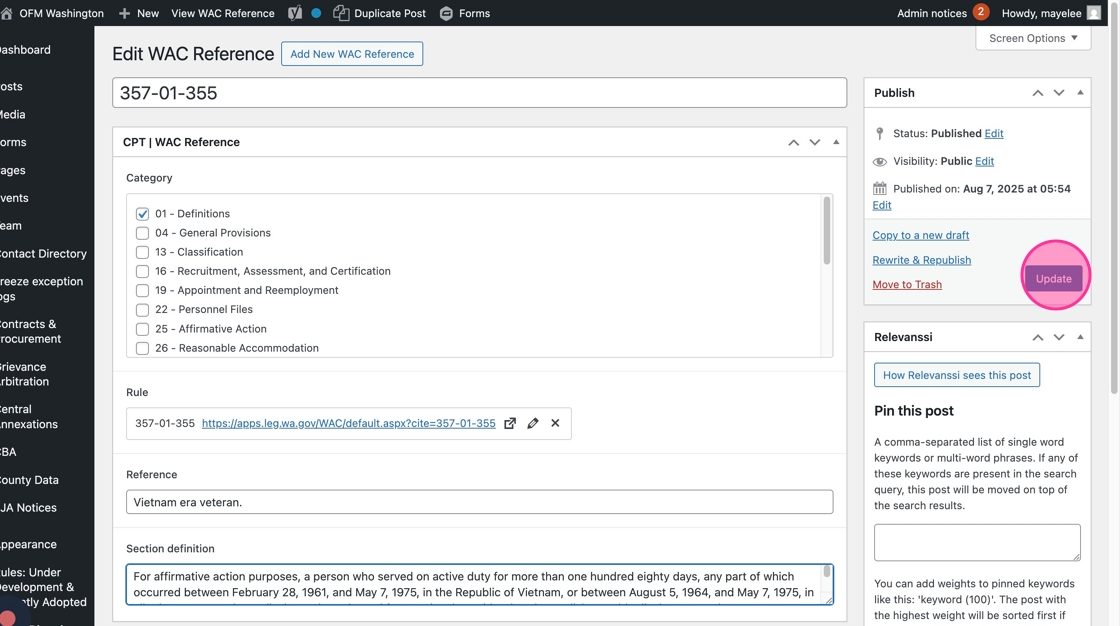
WAC References
Verify / Edit a WAC Reference
1. Navigate to the WAC References section of the admin panel.

2. Click Categories to sort the list – this will sort based on the WAC Reference category, chronologically.

3. Click into a WAC Reference title to edit / verify.

4. Verify the Category and Sub-Category option(s) selected are correct.
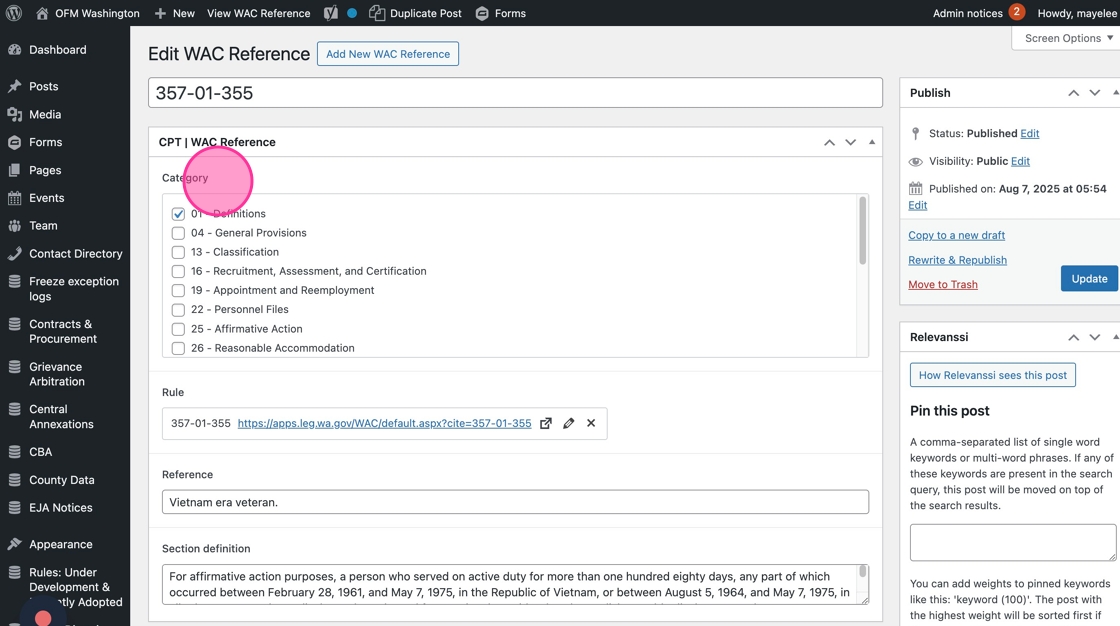
5. To edit: click the checkbox to select/de-select.

6. Verify the Rule Link is correct.

7. To edit: click the pencil icon to open the Link Menu options.

8. If needed, in the File/Link settings, update the URL field by typing the correct URL.
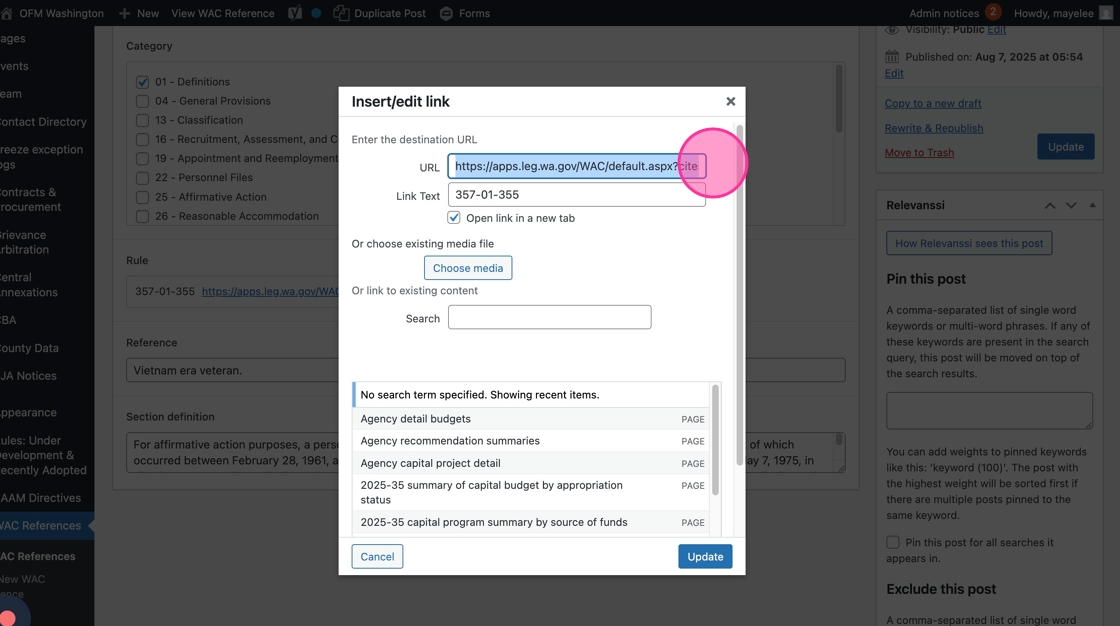
9. To edit the Link Text, click into the field to type.

10. Verify the “Open link in a new tab” checkbox is selected.

11. Click the “Update” to save the Link settings.

12. Verify the Reference field is correct.
To edit, click into the field to add the necessary text.
Note: this field’s data is used for search results, but does not get displayed on the public-facing site.

13. Verify the Section Definition field is correct.
To edit, click into the field to add the necessary text.
Note: this field’s data is used for search results, but does not get displayed on the public-facing site.

14. Click the “Submit” button to save any changes made to the Reference.
Tip: Repeat Steps 1–14 to review the remaining WAC References.
Create a new WAC Reference entry
1. To create a new WAC Reference, click the Add New WAC Reference button.

2. Fill in each of the fields, similar to the verification process outlined above, then click Publish once the WAC Reference is filled out.
