Remote work ergonomics
State HR - Planning
Contact information
Ergonomic assessments are a very important part of the health and safety of our employees, regardless of if the telework situation is temporary or long term. On this page, you'll find the step by step process of performing a remote ergonomic evaluation. We've also provided resources for both employees and supervisors to ensure employees are working safely and ergonomically in their remote environment. These resources include a remote ergonomic self-assessment, a remote ergonomic checklist, and a list of recommended equipment and tools an agency may want to issue to teleworking employees. You'll also find a link to additional resources from L&I on ergonomics.
Ergonomic assessment process flow
The assessment process may begin in several different ways.
The employee may choose to do a self-assessment,
The employee may choose one of the following options to request an ergonomic assessment. They may reach out to:
Their supervisor, or
The agency’s designated ergonomic specialist/HR professional.
It may be an optional part of an employer’s New Employee Orientation,
It may come about as part of the reasonable accommodation process,
It could be due to an L&I claim filed by the employee,
It could be offered as part of the process when an employee requests to telework, or
Their supervisor requests assessment.
Regardless of how the process starts, there are several steps that should be followed.
There are many good resource materials available to employees. A good starting point for any employee would be their agency internal website and the Labor and Industries Ergonomic website. The employee can find great information on the process, tools and training.
These links are where the employee or supervisor will find the necessary tools to get them through the ergonomic process:
- State HR Ergonomic Checklist [Word doc]
- State HR Self-assessment form(s) [Word doc]
- State HR Recommended Equipment for Telework [Word doc]
- Educational materials such as the Ergonomics Section of LNI's Safety and Health page
After the employee has reviewed the educational material as identified on the ergonomics checklist, they would then move to step 2.
The Self-Assessment gives the employee and employer a place to document the employees’ specific concerns and lead them through taking care of themselves. The self-assessment may include pictures of the employee’s workspace, but photos must not be required. (The supervisor may provide the L&I “photo tips” below to the employee to assist in getting useful photos.) Please work with the employee on what process works best in each situation.
- If the employee’s self-assessment identifies areas of concern, they should contact their supervisor, Human Resources and/or Ergonomics Specialist; whichever agency policy requires. (Note: the request from the employee does not have to go through the supervisor. Please check agency internal policy.)
- If no concerns, the supervisor should check in with employee after self-assessment received and file employee self-assessment.
If after discussion with the employee, the supervisor decides an official assessment/evaluation is necessary, the employee or supervisor would reach out to the HR/Ergonomics Evaluator. The Evaluator will then schedule a remote evaluation and send notice to employee with a cc to the supervisor to ensure educational materials have been reviewed and the employee self-assessment has been completed.
There are several items that should be completed prior to the actual meeting with the employee. To prepare for the ergonomic assessment, the evaluator will want to know if the employee has any concerns about video evaluations. If so, this concern may need to be resolved prior to the virtual meeting. In addition, the evaluator will also need the following from the employee. They are listed in order of importance.
- Review the educational materials in their entirety (see Ergonomics Checklist).
- Complete the self-assessment
- Provide pictures if the employee chooses to do so prior to the meeting (see Photograph section below and photo tip sheet)
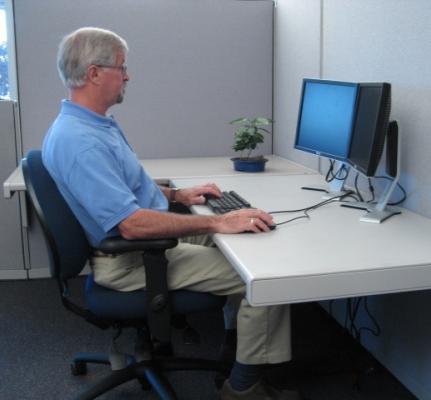
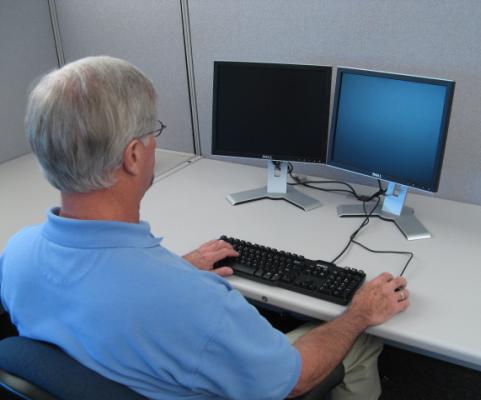
- Four photos are recommended, which will show side views of employee sitting in the chair at their workstation with hands on the keyboard/mouse currently in use. It may be possible to get all of the four angles in two photos, however:
- Head to waist including the screen employee is looking at when working
- Shoulders to seat of the chair with hands on the keyboard
- Shoulders to seat of the chair with hand on the mouse
- Waist to feet while sitting with hands on the keyboard/mouse
- Four photos are recommended, which will show side views of employee sitting in the chair at their workstation with hands on the keyboard/mouse currently in use. It may be possible to get all of the four angles in two photos, however:
- Provide measurements of their work area to include:
- The work surface/desk or tabletop (width and depth)
- Height of desktop from floor
- The opening under the desk where legs are when working (width and height)
Once the preliminary work has been completed, the evaluator will schedule time to meet virtually with the employee and supervisor (supervisor optional) to complete the evaluation.
Important note about photographs
Photographs submitted by an employee to assist in an ergonomic evaluation invite concerns about privacy and public records. If the employee chooses to provide photos of themselves in their home workspace, agencies are strongly advised to do the following:
Delete the photos once the information needed has been obtained and transcribed into the final report. The information needed for the assessment should be transcribed into the ergonomic report. The photos can then be destroyed, and the 6-year record retention period for ergonomics related data will apply to the ergonomic assessment as the official record.
Provide employees instructions for what to do with photos. Employees who would like to participate should delete the sent message from their Sent mail folder in Outlook. If your agency does not support the use of personal devices for official state business, employees should be encouraged to use only state-owned equipment for capturing these photos whenever possible. Recipients of the photos should only open the photos in Outlook and not save any local copies to their computer. Once staff have transcribed the data from the photos, staff should also delete the received email with the photos within 10 days of receipt of the email and photos to ensure the photos do not end up in the Vault.
What happens next? Once the ergonomics evaluation has been completed there are several steps that still need to be completed. Coordination with the appropriate HR consultant within the agency is important, regardless of the reason for the evaluation.
-
Evaluation as part of the reasonable accommodation process – If the evaluation is connected to a reasonable accommodation (“RA”), the Ergonomics Specialist should meet with the appropriate HR Consultant prior to rendering their findings to the employee. There may be other factors that will need to be considered as part of the interactive RA process. This would depend on the employee’s disability/disabilities as well as any other barriers or limitations identified by the employee’s health care provider.
-
Evaluation due to a medical issue – If the evaluation is due to an underlying medical issue, the Ergonomics Specialist should meet with the appropriate HR Consultant prior to rendering their findings to the employee. There may be other factors that will need to be considered as part of the interactive process.
- Evaluation due to new employee orientation, telework agreement, prevention, discomfort or as a follow up –
- Follow internal agency policy regarding notification and approval (HRC, Supervisor, and Appointing Authority). To include:
- Following agency internal operational process
- Coordinate with agency HR Consultant before the Ergonomics Specialist recommends any purchases of equipment.
- Write up findings and recommendations and send the report to the employee and supervisor, including what solutions were recommended/provided to ensure correct ergonomics.
- Review of findings from remote consultation with the employee and supervisor. Schedule a phone or online meeting to go over analysis and recommendations.
- What solutions/options are available
- Any additional training or resource recommendations
- Is equipment needed? If so, work with employee and supervisor for processing and approval of request and delivery to employee.
- Follow internal agency policy regarding notification and approval (HRC, Supervisor, and Appointing Authority). To include:
Once an ergonomics evaluation has been completed, whether an employee self-assessment or a formal evaluation, it is very important to follow up with the employee. Check in with the employee within 4-6 weeks to make sure:
-
The employee has put the recommended ergonomic changes in place
-
The employee is following correct ergonomic practices
-
The solutions work
-
They received the recommended equipment if appropriate.
Note: Follow up with employee can be done in a number of ways: survey, email, or follow-up meeting. It is always a good reminder that if the follow up is in writing or a survey, the results could be public record. Agencies should be thoughtful about what they are asking employees to put into a potential public record.
A message that can be sent to employees:
In order for you to get ergonomic support quickly and efficiently, we’d like to offer a remote assessment of your office workstation. While not required, good photos are a very helpful part of the remote assessment. We'd like to see how you interact with your work area, especially your computer if you use it a lot.
- If possible, have someone take photos of you at your desk from a few different angles. Take at least one photo that shows you from the side, from your head to your feet. Please don’t “pose” for the photos. Just work as you normally do so that the photos show your typical posture. Examples:
- Include a few photos of the workstation without you in it so we can better see your work layout and equipment.
- If you have particular issues or work tasks that you’re concerned about, be sure to take photos of those as well.


